Introduction
Overview
Teaching: 20 min
Exercises: 0 minQuestions
What do I do when I need to make complex decisions with my git respository?
How do I collaborate on a software project with others?
Objectives
Understand the range of functionality that exists in git.
Understand the different challenges that arrise with collaborative projects.
Git Refresher
Git is a version control system for tracking changes in computer files and coordinating work on those files among multiple people. It is primarily used for source code management in software development but it can be used to track changes in files in general - it is particularly effective for tracking text-based files (e.g. source code files, CSV, Markdown, HTML, CSS, Tex, etc. files).
Git has several important characteristics:
- support for non-linear development allowing you and your colleagues to work on different parts of a project concurrently,
- support for distributed development allowing for multiple people to be working on the same project (even the same file) at the same time,
- every change recorded by Git remains part of the project history and can be retrieved at a later date, so even if you make a mistake you can revert to a point before it.
It uses a distributed version control model (the “beautiful graph theory tree model”), meaning that there is no single central repository of code. Instead, users share code back and forth to synchronise their repositories, and it is up to each project to define processes and procedures for managing the flow of changes into a stable software product.
Git is powerful and flexible to fit a wide range of use cases and workflows from simple projects written by a single contributor to projects that are millions of lines and have hundreds of co-authors. Furthermore, it does a task that is quite complex. As a result, many users may find it challenging to navigate this complexity. While committing and sharing changes is fairly straightforward, for instance, but recovering from situations such as accidental commits, pushes or bad merges is difficult without a solid understanding of the rather large and complex conceptual model. Case in point, three of the top five highest voted questions on Stack Overflow are questions about how to carry out relatively simple tasks: undoing the last commit, changing the last commit message, and deleting a remote branch.
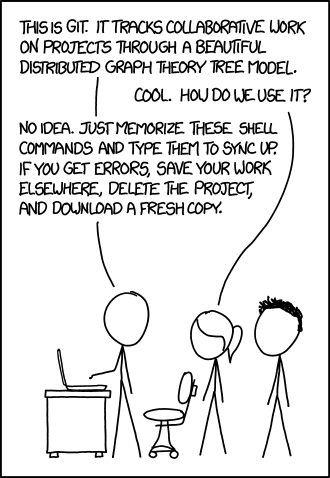
Mouse-over text: If that doesn’t fix it, git.txt contains the phone number of a friend of mine who understands git. Just wait through a few minutes of ‘It’s really pretty simple, just think of branches as…’ and eventually you’ll learn the commands that will fix everything.
With this lesson our goal is to give a you a more in-depth understanding of the conceptual model of git, to guide you through increasingly complex workflows and to give you the confidence to participate in larger projects.
The diagram below shows a typical software development lifecycle with Git (in our case starting from making changes in a local branch that “tracks” a remote branch) and the commonly used commands to interact with different parts of the Git infrastructure, including:
- working tree -
a local directory (including any subdirectories) where your project files live
and where you are currently working.
It is also known as the “untracked” area of Git or “working directory”.
Any changes to files will be marked by Git in the working tree.
If you make changes to the working tree and do not explicitly tell Git to save them -
you will likely lose those changes.
Using
git add filenamecommand, you tell Git to start tracking changes to filefilenamewithin your working tree. - staging area (index) -
once you tell Git to start tracking changes to files
(with
git add filenamecommand), Git saves those changes in the staging area on your local machine. Each subsequent change to the same file needs to be followed by anothergit add filenamecommand to tell Git to update it in the staging area. To see what is in your working tree and staging area at any moment (i.e. what changes is Git tracking), run the commandgit status. - local repository -
stored within the
.gitworking tree of your project locally, this is where Git wraps together all your changes from the staging area and puts them using thegit commitcommand. Each commit is a new, permanent snapshot (checkpoint, record) of your project in time, which you can share or revert to. - remote repository -
this is a version of your project that is hosted somewhere on the Internet
(e.g., on GitHub, GitLab or somewhere else).
While your project is nicely version-controlled in your local repository,
and you have snapshots of its versions from the past,
if your machine crashes - you still may lose all your work. Furthermore, you cannot
share or collaborate on this local work with others easily.
Working with a remote repository involves pushing your local changes remotely
(using
git push) and pulling other people’s changes from a remote repository to your local copy (usinggit fetchorgit pull) to keep the two in sync in order to collaborate (with a bonus that your work also gets backed up to another machine). Note that a common best practice when collaborating with others on a shared repository is to always do agit pullbefore agit push, to ensure you have any latest changes before you push your own.

Git Version Control Tool
To test your Git installation, type:
$ git help
If your Git installation is working you should see something like:
usage: git [-v | --version] [-h | --help] [-C <path>] [-c <name>=<value>]
           [--exec-path[=<path>]] [--html-path] [--man-path] [--info-path]
           [-p | --paginate | -P | --no-pager] [--no-replace-objects] [--bare]
           [--git-dir=<path>] [--work-tree=<path>] [--namespace=<name>]
           [--config-env=<name>=<envvar>] <command> [<args>]

These are common Git commands used in various situations:

start a working area (see also: git help tutorial)
   clone     Clone a repository into a new directory
   init      Create an empty Git repository or reinitialize an existing one

work on the current change (see also: git help everyday)
   add       Add file contents to the index
   mv        Move or rename a file, a directory, or a symlink
   restore   Restore working tree files
   rm        Remove files from the working tree and from the index

examine the history and state (see also: git help revisions)
   bisect    Use binary search to find the commit that introduced a bug
   diff      Show changes between commits, commit and working tree, etc
   grep      Print lines matching a pattern
   log       Show commit logs
   show      Show various types of objects
   status    Show the working tree status

grow, mark and tweak your common history
   branch    List, create, or delete branches
   commit    Record changes to the repository
   merge     Join two or more development histories together
   rebase    Reapply commits on top of another base tip
   reset     Reset current HEAD to the specified state
   switch    Switch branches
   tag       Create, list, delete or verify a tag object signed with GPG

collaborate (see also: git help workflows)
   fetch     Download objects and refs from another repository
   pull      Fetch from and integrate with another repository or a local branch
   push      Update remote refs along with associated objects

'git help -a' and 'git help -g' list available subcommands and some
concept guides. See 'git help <command>' or 'git help <concept>'
to read about a specific subcommand or concept.
See 'git help git' for an overview of the system.
When you use Git on a machine for the first time, you need to configure a few things:
- your name,
- your email address (the one you used to open your GitHub account with, which will be used to uniquely identify your commits),
- preferred text editor for Git to use (e.g.
nanoor another text editor of your choice), - whether you want to use these settings globally (i.e. for every Git project on your machine).
This can be done from the command line as follows:
$ git config --global user.name "Your Name"
$ git config --global user.email "name@example.com"
$ git config --global core.editor "nano -w"
GitHub Account
GitHub is a free, online host for Git repositories that you will use during the course to store your code in so you will need to open a free GitHub account unless you do not already have one.
Secure Access To GitHub Using Git From Command Line
In order to access GitHub using Git from your machine securely, you need to set up a way of authenticating yourself with GitHub through Git. The recommended way to do that for this course is to set up SSH authentication - a method of authentication that is more secure than sending passwords over HTTPS and which requires a pair of keys - one public that you upload to your GitHub account, and one private that remains on your machine.
GitHub provides full documentation and guides on how to:
A short summary of the commands you need to perform is shown below.
To generate an SSH key pair, you will need to run the ssh-keygen command from your command line tool/GitBash
and provide your identity for the key pair (e.g. the email address you used to register with GitHub)
via the -C parameter as shown below.
Note that the ssh-keygen command can be run with different parameters -
e.g. to select a specific public key algorithm and key length;
if you do not use them ssh-keygen will generate an
RSA
key pair for you by default.
GitHub now recommends that you use a newer cryptographic standard (such as EdDSA variant algorithm Ed25519),
so please be sure to specify it using the -t flag as shown below.
It will also prompt you to answer a few questions -
e.g. where to save the keys on your machine and a passphrase to use to protect your private key.
Pressing ‘Enter’ on these prompts will get ssh-keygen to use the default key location (within
.ssh folder in your home directory)
and set the passphrase to empty.
$ ssh-keygen -t ed25519 -C "your-github-email@example.com"
Generating public/private ed25519 key pair.
Enter file in which to save the key (/Users/<YOUR_USERNAME>/.ssh/id_ed25519):
Enter passphrase (empty for no passphrase):
Enter same passphrase again:
Your identification has been saved in /Users/<YOUR_USERNAME>/.ssh/id_ed25519
Your public key has been saved in /Users/<YOUR_USERNAME>/.ssh/id_ed25519.pub
The key fingerprint is:
SHA256:qjhN/iO42nnYmlpink2UTzaJpP8084yx6L2iQkVKdHk your-github-email@example.com
The key's randomart image is:
+--[ED25519 256]--+
|.. ..            |
| ..o A           |
|. o..            |
| .o.o .          |
| ..+ =  B        |
| .o = ..         |
|o..X *.          |
|++B=@.X          |
|+*XOoOo+         |
+----[SHA256]-----+
Next, you need to copy your public key (not your private key - this is important!) over to
your GitHub account. The ssh-keygen command above will let you know where your public key is saved (the file should have the
extension “.pub”), and you can get its contents (e.g. on a Mac OS system) as follows:
$ cat /Users/<YOUR_USERNAME>/.ssh/id_ed25519.pub
ssh-ed25519 AABAC3NzaC1lZDI1NTE5AAAAICWGVRsl/pZsxx85QHLwSgJWyfMB1L8RCkEvYNkP4mZC your-github-email@example.com
Copy the line of output that starts with “ssh-ed25519” and ends with your email address (it may start with a different algorithm name based on which one you used to generate the key pair and it may have gone over multiple lines if your command line window is not wide enough).
Finally, go to your GitHub Settings -> SSH and GPG keys -> Add New page to add a new SSH public key. Give your key a memorable name (e.g. the name of the computer you are working on that contains the private key counterpart), paste the public key from your clipboard into the box labelled “Key” (making sure it does not contain any line breaks), then click the “Add SSH key” button.
Now, we can check that the SSH connection is working:
$ ssh -T git@github.com
What About Passwords?
While using passwords over HTTPS for authentication is easier to setup and will allow you read access to your repository on GitHub from your machine, it alone is not sufficient any more to allow you to send changes or write to your remote repository on GitHub. This is because, on 13 August 2021, GitHub has strengthened security requirements for all authenticated Git operations. This means you would need to use a personal access token instead of your password for added security each time you need to authenticate yourself to GitHub from the command line (e.g. when you want to push your local changes to your code repository on GitHub). While using SSH key pair for authentication may seem complex, once set up, it is actually more convenient than keeping track of/caching your access token.
Key Points
Git version control records text-based differences between files.
Each git commit records a change relative to the previous state of the documents.
Git has a range of functionality that allows users to manage the changes they make.
This complex functionality is especially useful when collaborating on projects with others
Forks
Overview
Teaching: 5 min
Exercises: 5 minQuestions
What are forks?
Objectives
Understand how forks are created.
A fork of a repository is a new repository which shares code and history with the repository it was forked from - it is a server-side copy (clone) of the original repository. This is particularly useful when you want to work on an open source project where you don’t have write permissions to the repository.
Creating a fork and a local copy of the fork
In order to try out the commands in this lesson we need to set up a repository on GitHub:
- Go to https://github.com/NOC-OI/intermediate-git-test-repo
- Click on the
Forkbutton on the top right and follow the instructions. Make sure the ‘Copy the main branch only’ option is not selected. When this is process is done, you will be directed to your copy of the repository on GitHub. - Click the green
Codebutton. Copy theSSHpath to the repository to your local machine. Do not download a ZIP file. - Create a local copy. The command will be similar to this but with your user name:
git clone git@github.com:<user-name>/intermediate-git-test-repo.git
Exercise 1: Create a fork
Follow the above instructions to create a fork of the intermediate-git-test-repo and a local copy of it.
Exercise 2: Download data and ensure code runs
To run this code we also need some data files. You can download these from https://noc-oi.github.io/python-intermediate-esces/data/data.zip. Create a sub directory called
datain your code repository and extract the zip file into that directory. Ensure the code runs by running it with Python.Solution
curl -O https://noc-oi.github.io/python-intermediate-esces/data/data.zip
mkdir data
cd data
unzip ../data.zip
cd ..
python plot_buoys.py
We’ll discuss forking further in the Remotes and Branching Models chapters.
Key Points
A fork is a server-side copy of a repository
A fork can be created on Github through the
Forkbutton in the top right
Branches
Overview
Teaching: 20 min
Exercises: 10 minQuestions
What are branches?
How do I view the current branches?
How do I manipulate branches?
Objectives
Understand how branches are created.
Learn the key commands to view and manipulate branches.
Branching is a feature available in most modern version control systems. Branching in other version control systems can be an expensive operation in both time and disk space. In git, branches are a part of your everyday development process. When you want to add a new feature or fix a bug—no matter how big or how small—you spawn a new branch to encapsulate your changes. This makes it harder for unstable code to get merged into the main code base, and it gives you the chance to clean up your future’s history before merging it into the main branch.
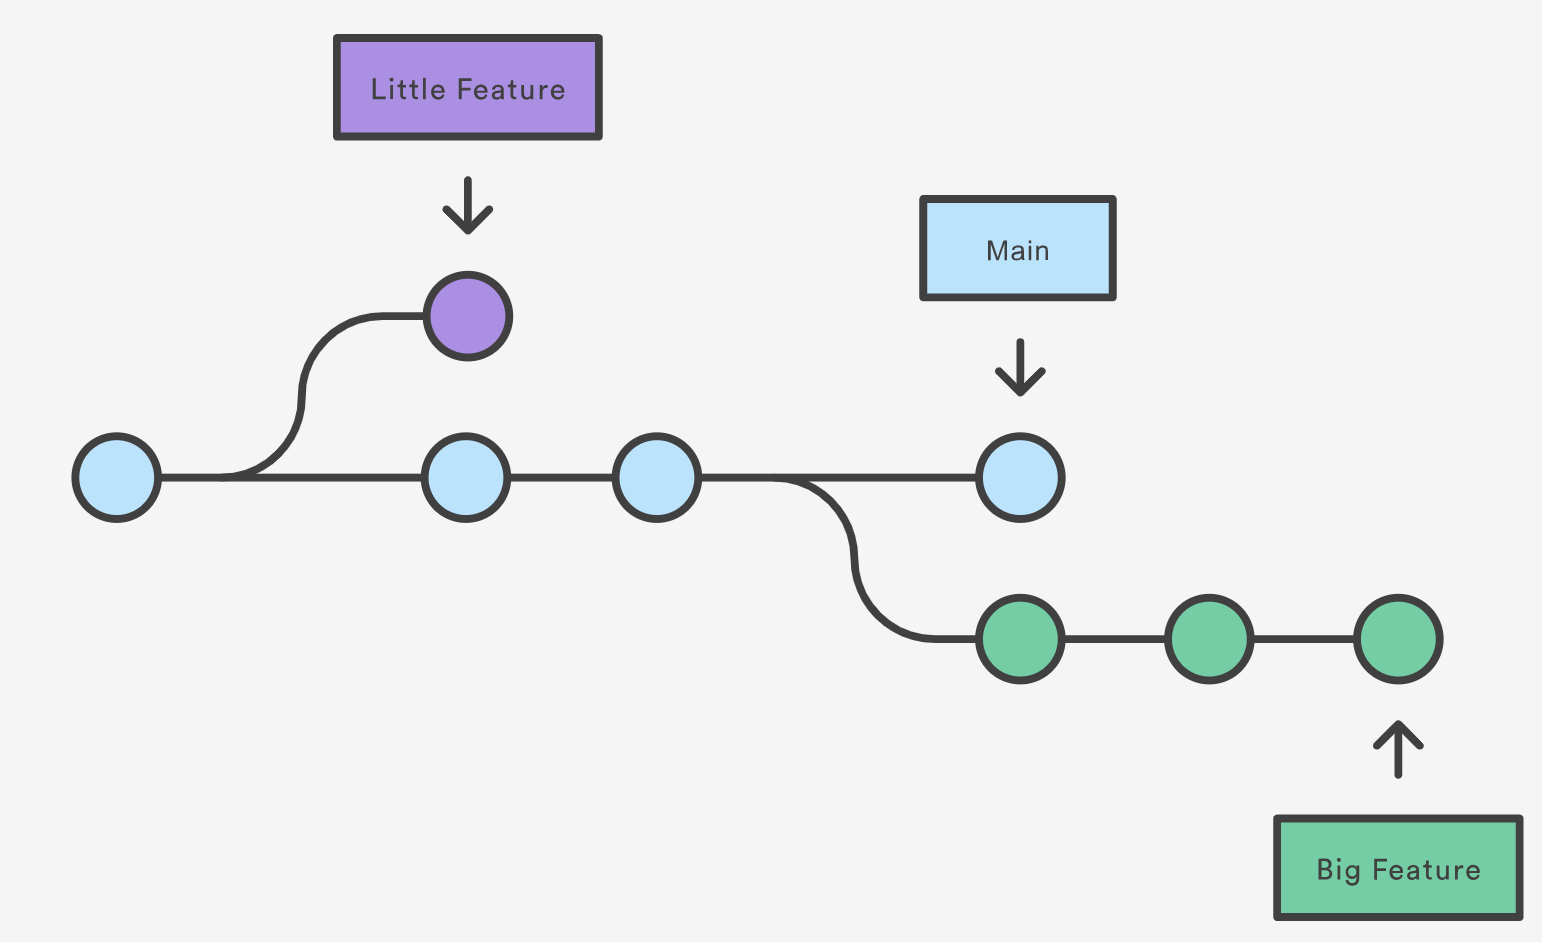
The diagram above visualizes a repository with two isolated lines of development, one for a little feature, and one for a longer-running feature. By developing them in branches, it’s not only possible to work on both of them in parallel, but it also keeps the main branch free from questionable code.
The implementation behind Git branches is much more lightweight than other version control system models. Instead of copying files from directory to directory, Git stores a branch as a reference to a commit. In this sense, a branch represents the tip of a series of commits—it’s not a container for commits. The history for a branch is extrapolated through the commit relationships (REFERENCE).
What is a branch?
In git a branch is effectively a pointer to a snapshot of your changes. It’s important to understand that branches are just pointers to commits. When you create a branch, all Git needs to do is create a new pointer, it doesn’t change the repository in any other way. If you start with a repository that looks like this:
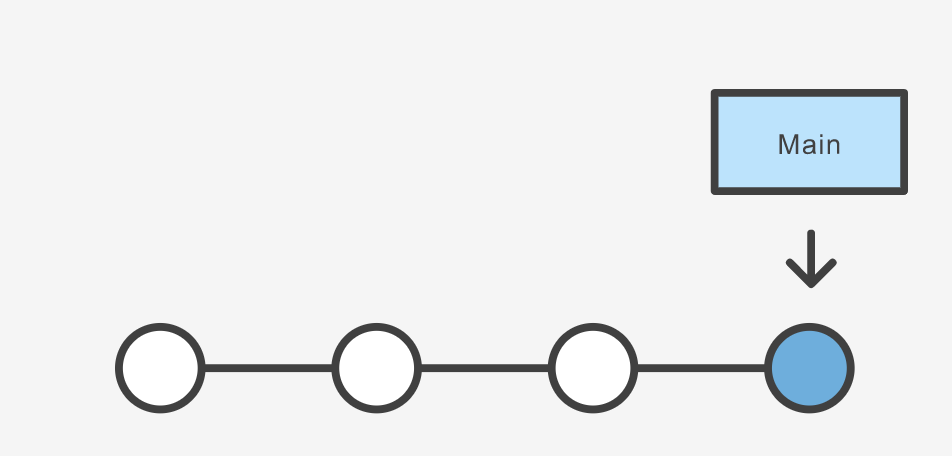
Then, you create a branch using the following command:
git branch crazy-experiment
The repository history remains unchanged. All you get is a new pointer to the current commit:
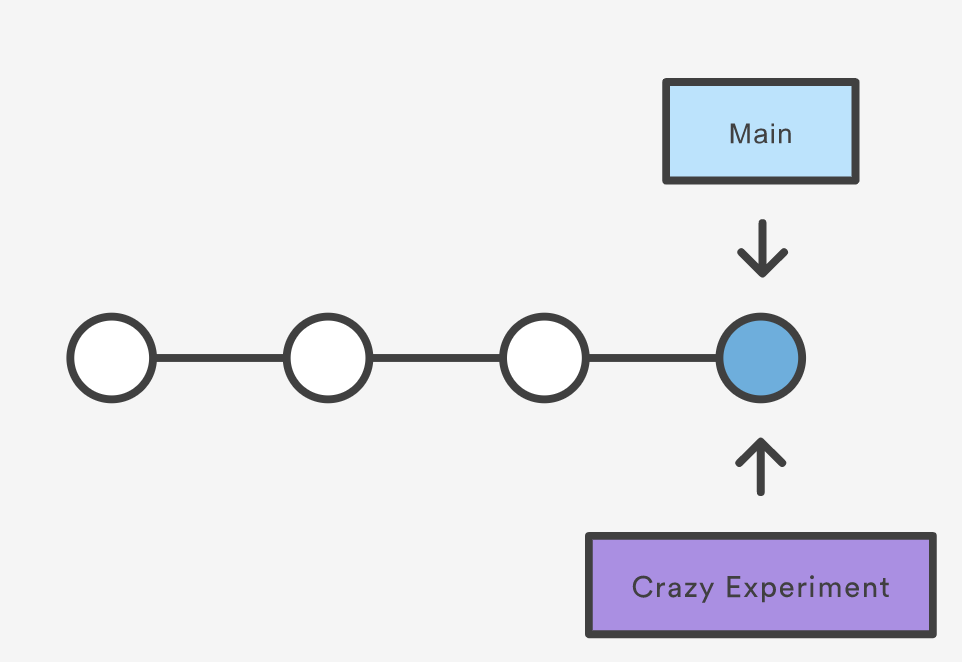
Note that this only creates the new branch. To start adding commits to it, you need to select it with git switch, and then use the standard git add and git commit commands.
A branch also means an independent line of development. Branches serve as an abstraction for the edit/stage/commit process. New commits are recorded in the history for the current branch, which results in a fork in the history of the project. However, it is really important to remember that each commit only records the incremental change in the document and NOT the full history of changes. Therefore, while we think of a branch as a sequence of commits, each commit is an independent unit of change.
Branching Commands
Creating, deleting, and modifying branches is quick and easy; here’s a summary of the commands:
To list all branches:
git branch
To create a new branch named <branch>, which references the same point in history as the current branch.
git branch <branch>
To create a new branch named <branch>, referencing <start-point>, which may be specified any way you like, including using a branch name or a tag name:
git branch <branch> <start-point>
To delete the branch <branch>; if the branch is not fully merged in its upstream branch or contained in the current branch, this command will fail with a warning:
git branch -d <branch>
To delete the branch <branch> irrespective of its merged status:
git branch -D <branch>
To switch to a different branch <branch>, updating the working directory to reflect the version referenced by <branch>.
git switch <branch>
To create a new branch <new> referencing <start-point>, and switch to it.
git switch -c <new> <start-point>
The special symbol "HEAD" can always be used to refer to the current branch. In fact, Git uses a file named HEAD in the .git directory to remember which branch is current:
$ cat .git/HEAD
ref: refs/heads/main
Renaming a branch can be done with the -m tag:
git branch -m <old-branch-name> <new-branch-name>
Exercise 1: Create and delete a branch
Create a branch in your local copy of intermediate-git-test-repo, list all the branches, then delete the new branch.
Solution
git branch
git branch test-branch
git branch
git branch -d test-branch
Exercise 2: Create a feature branch
Create a feature branch in your local copy of intermediate-git-test-repo. Make a change to the
plot_buoys.pyscript, such as changing the colour of the buoy symbols on line 28. Commit your change and push it to your fork on Github.Solution
git branch feature-branch
git switch feature-branch
Make some edits to
plot_buoys.py, try changing the marker colour from red to blue. This is done on the line beginningbuoys_geo.plot.git add plot_buoys.py git commit -m "Change colour of buoy marker" git push origin feature-branch
git checkout
Sometimes, instead of using git switch, you may see the command
git checkout <branch>(orgit checkout -b <branch>to create and switch to a new branch). This command was used in earlier versions of Git to switch branches or restore files. This command is still available, but it is recommended to usegit switchfor switching branches andgit restorefor restoring files. Thegit checkoutcommand has been split into these two commands to make it clearer what you are trying to do.
git log
If you want to see the history of commits in a branch, you can use the
git logcommand. This will show you all the commits in the current branch, along with their commit messages and other details.
Key Points
A branch represents an independent line of development.
git branchcreates a new pointer to the current state of the repository and allows you to make subsequent changes from that state.Subsequent changes are considered to belong to that branch.
The final commit on a given branch is its HEAD.
Remote Repositories
Overview
Teaching: 20 min
Exercises: 20 minQuestions
How can I work in remote teams and with remotely hosted code?
Objectives
Learn to work with multiple remotes
Git’s distributed collaboration model, which gives every developer their own copy of the repository, complete with its own local history and branch structure. Users typically need to share a series of commits rather than a single “changeset”. Instead of committing a “changeset” from a working copy to the central repository, Git lets you share entire branches between repositories (REFERENCE).
Git remote
The git remote command lets you create, view, and delete connections to other repositories. Remote connections are more like bookmarks rather than direct links into other repositories. Instead of providing real-time access to another repository, they serve as convenient names that can be used to reference a not-so-convenient URL.
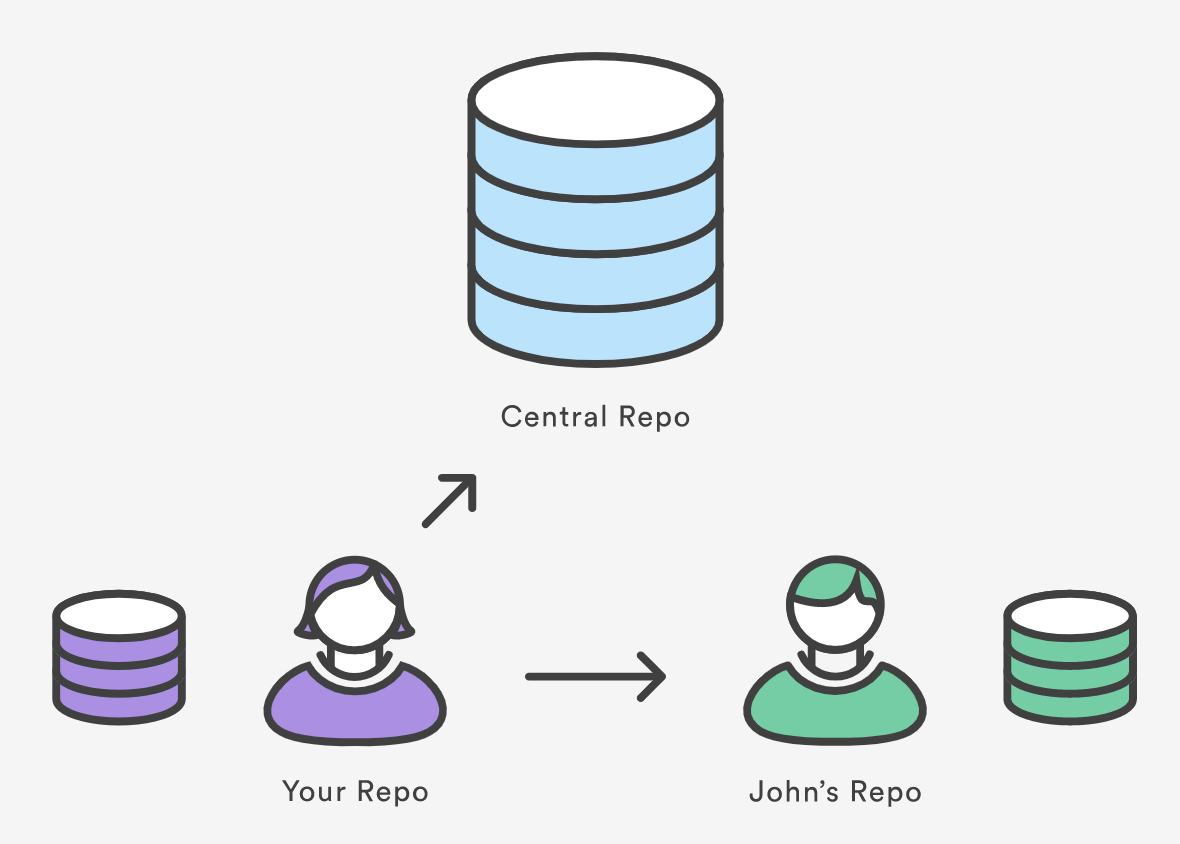
For example, the diagram above shows two remote connections from your repo into the central repo and another developer’s repo. Instead of referencing them by their full URLs, you can pass the origin and john shortcuts to other Git commands.
The git remote command is essentially an interface for managing a list of remote entries that are stored in the repository’s ./.git/config file. The following commands are used to view the current state of the remote list.
Git is designed to give each developer an entirely isolated development environment. This means that information is not automatically passed back and forth between repositories. Instead, developers need to manually pull upstream commits into their local repository or manually push their local commits back up to the central repository. The git remote command is really just an easier way to pass URLs to these “sharing” commands.
View Remote Configuration
To list the remote connections of your repository to other repositories you can use the git remote command:
git remote
If you test this in the local repo you’ve created, you should get only one connection, origin:
origin
When you clone a repository with git clone, git automatically creates a remote connection called origin pointing back to the cloned repository. This is useful for developers creating a local copy of a central repository, since it provides an easy way to pull upstream changes or publish local commits. This behaviour is also why most Git-based projects call their central repository origin.
We can ask git for a more verbose (-v) answer which gives us the URLs for the connections:
git remote -v
For our training repository this should return:
origin	git@github.com:<user-name>/intermediate-git-test-repo.git (fetch)
origin	git@github.com:<user-name>/intermediate-git-test-repo.git (push)
As expected these point to the repository you cloned.
Create and Modify Connections
The git remote command also lets you manage connections with other repositories. The following commands will modify the repo’s ./.git/config file. The result of the following commands can also be achieved by directly editing the ./.git/config file with a text editor.
Create a new connection to a remote repository. After adding a remote, you’ll be able to use <name> as a convenient shortcut for <url> in other Git commands.
git remote add <name> <url>
Remove the connection:
git remote rm <name>
Rename a connection:
git remote rename <old-name> <new-name>
To change the url for a remote:
git remote set-url <new-url>
To get high-level information about the remote <name>:
git show <name>
Exercise 1: Add and delete a connection to your neighbour’s repository.
Having this kind of access to individual developers’ repositories makes it possible to collaborate outside of the central repository. This can be very useful for small teams working on a large project.
Solution
git remote add john http://dev.example.com/john.git
git remote -v
git remote rm john
git remote -v
Multiple remotes
Remember that when you create a new branch without specifying a starting point, then the starting point will be the current state and branch. In order to avoid confusion, ALWAYS branch from the stable version. Here is how you would branch from your own origin/main branch:
git fetch origin main
git branch <branch> origin/main
git switch <branch>
You must fetch first so that you have the most recent state of the repository.
If there is another “true” version/state of the project, then this connection may be set as upstream (or something else). Upstream is a common name for the stable repository, then the sequence will be:
git fetch upstream main
git branch <branch> upstream/main
git switch <branch>
Now we can set the NOC-OI version of our repository as the upstream for our local copy.
Exercise 2: Setting upstream and checking out remote branches.
Set the https://github.com/NOC-OI/intermediate-git-test-repo repo as the upstream locally. Then check which branches exist upstream and create a local branch with the starting point of the upstream branch called
develop.Solution
git remote add upstream https://github.com/NOC-OI/intermediate-git-test-repo.git
git fetch upstream
git branch -vv -a
git branch develop upstream/develop
git switch develop
Now examine the state of your repository with
git branch,git remote -vandgit remote show upstream.
Tracking / Upstream Branches
We can see that we are now on a local branch develop, which is
configured to track the develop branch in upstream. Running git
push and git pull in this branch will automatically push to this remote branch. We can verify this with
$ git pull -v
Things get a little bit confusing here because one of our remotes, by convention, is called upstream. However, we will now start talking about upstream branches. What we mean by that is (typially) a remote branch which a local branch is tracking.
We can also examine our upstream branches some arguments to the git branch command. -a will show you local and remote branches and -vv will show the relationship to upstream branches.
Exercise 3: Upstream branches.
Try using the above arguments to
git branch.Solution
$ git branch -vva
If we wanted to switch the default remote for this branch, we could use git branch --set-upstream-to <remote/branch> (or --u).
The develop branch we checked out from the upstream remote branch a small commit which is not in your origin remote.
Exercise 4: Pushing to origin.
Push these changes we’ve pulled down to own remote repository (
origin).Solution
$ git push origin developRegardless of what is set as the upstream branch, you can always be explicit about the remote and branch name. There are many ways you could format this command, see the git push documentation for options.
Having Github and Gitlab Remotes
You might want to have remote copies of your repository on both Github and Gitlab. For example, you might have developed code on NOC’s Gitlab, in a private repository, but now you want a copy on Github, which will be open to the public.
We will actually demo this in reverse, seeing as our test repo is already set up on Github. Therefore, let’s create a blank project in Gitlab, add a new remote to our local repo and push the main branch to Gitlab.
Exercise 4: Set up a Gitlab remote.
Try to set up a remote in Gitlab, as discussed in the paragraph above.
We can configure as many remotes as we like. If you work closely with friends or colleagues, it could be common for you to want to pull interesting changes from their remotes, incorporate those into your current branches, and push those changes to your remote.
Key Points
The
git remotecommand allows us to create, view and delete connections to other repositories.Remote connections are like bookmarks to other repositories.
Other git commands (
git fetch,git push,git pull) use these bookmarks to carry out their syncing responsibilities.
Branching Models
Overview
Teaching: 20 min
Exercises: 10 minQuestions
What is a branching model?
Why do you need one?
What are the most common branching models?
Objectives
Learn about the importance of a branching model.
What is a branching model/strategy?
Branches are primarily used as a means for teams to develop features giving them a separate workspace for their code. These branches are usually merged back to a main branch upon completion of work. (You may come across the term ‘master’, rather than ‘main’. This used to be the usual term, but is now gradually becoming less common.) In this way, features (and any bug and bug fixes) are kept apart from each other allowing you to fix mistakes more easily.
This means that branches protect the mainline of code and any changes made to any given branch don’t affect other developers.
A branching strategy, therefore, is the strategy that software development teams adopt when writing, merging and deploying code when using a version control system.
It is essentially a set of rules that developers can follow to stipulate how they interact with a shared codebase.
Such a strategy is necessary as it helps keep repositories organized to avoid errors in the application and the dreaded merge hell when multiple developers are working simultaneously and are all adding their changes at the same time. Such merge conflicts would eventually deter the combination of contributions from multiple developers.
Thus, adhering to a branching strategy will help solve this issue so that developers can work together without stepping on each other’s toes. In other words, it enables teams to work in parallel to achieve faster releases and fewer conflicts by creating a clear process when making changes to source control.
When we talk about branches, we are referring to independent lines of code that branch off the main branch, allowing developers to work independently before merging their changes back to the code base.
In this and the following episodes, we will outline some of the branching strategies that teams use in order to organize their workflow where we will look at their pros and cons and which strategy you should choose based on your needs, objectives and your team’s capabilities.
Why do you need a branching model?
As mentioned above, having a branching model is necessary to avoid conflicts when merging and to allow for the easier integration of changes into the main trunk.
A BRANCHING MODEL AIMS TO:
- Enhance productivity by ensuring proper coordination among developers
- Enable parallel development
- Help organize a series of planned, structured releases
- Map a clear path when making changes to software through to production
- Maintain a bug-free code where developers can quickly fix issues and get these changes back to production without disrupting the development workflow
Git Branching Models
Some version control systems are Very Opinionated about the branching models that can be used. git is very much (fortunately or unfortunately) not. This means that there are many different ways to do development in a team and the team needs to explicitly agree on how and when to merge contributions to the main branch. So the first rule of git branching is: “Talk about your branching model.” The second rule is: “Talk about your branching model.” If in doubt, do what other people around you are doing. If they don’t do anything, call a friend.
That said, there are a number of established (and less so) branching models that are used with git. These include, but are not limited to:
-
Centralized workflow: enables all team members to make changes directly to the main branch. Every change is logged into the history. In this workflow, the contributors do not use other branches. Instead they all make changes on the main branch directly and commit to it. This works for individual developers or small teams which communicate very well, but can be tricky for larger teams: the code is in constant state of flux and developers keep changes local until they are ready to release.
-
Trunk-based development: is somewhat similar to the centralized workflow. The development happens on a single branch called
trunk. When changes need to be merged, each developer pulls and rebases from the trunk branch and resolves conflicts locally. This can work if small merges are made frequently and is more successful if there is CI/CD. -
Feature branch workflow: every small change or “feature” gets its own branch where the developers make changes. Once the feature is done, they submit a merge/pull request and merge it into the main branch. Features branches should be relatively short-lived. The benefit of this model is that the main branch is not poluted by unfinished features. Good for teams.
-
Gitflow: is a model where the main development happens in a develop branch with feature branches. When the develop branch is ready for a release (or to go into production), a team member creates a release branch which is tested and eventually merged onto the dev and eventually main branch.
-
GitHub flow: similar to the branching workflow. (Further info)
-
GitLab flow: is a simplified version of Gitflow. (Further info)
-
Oneflow: is similar to Gitflow but relies on the maintanance of one long-lived branch. It is meant to be simpler, without a develop branch but feature branches still exist. (Further info)
-
Forking workflow (e.g. astropy): is a model where each contributor creates a
forkor a complete copy of the repository. Every contributor effectively has two repositories: his own and the main (upstream) one. Changes are made as pull requests against the main repository. This model is popular with open source projects because the vast majority of contributors do not need to have priviledges in the main repository.
A longer description of some of these can be found here.
In summary, there are many different ways to collaborate on a project. Look at the pros and cons and select one that fits the needs and organization of your team and project. In the following several sections we look at some of these models in more detail.
Feature Branch Workflow
While it is technically OK to commit your changes directly to main branch,
and you may often find yourself doing so for some minor changes,
the best practice is to use a new branch for each separate and self-contained unit/piece of work
you want to add to the project.
This unit of work is also often called a feature
and the branch where you develop it is called a feature branch.
Each feature branch should have its own meaningful name -
indicating its purpose (e.g. “issue23-fix”).
If we keep making changes and pushing them directly to the main branch on GitHub,
then anyone who downloads our software from there will get all of our work in progress -
whether or not it is ready to use!
So, working on a separate branch for each feature you are adding is good for several reasons:
- it enables the main branch to remain stable while you and the team explore and test the new code on a feature branch,
- it enables you to keep the untested and not-yet-functional feature branch code under version control and backed up,
- you and other team members may work on several features at the same time independently from one another, and
- if you decide that the feature is not working or is no longer needed - you can easily and safely discard that branch without affecting the rest of the code.
Gitflow Workflow
In the Gitflow workflow,
we typically have a main branch which is the version of the code that is
tested, stable and reliable.
Then, we normally have a development branch
(called develop or dev by convention)
that we use for work-in-progress code.
As we work on adding new features to the code,
we create new feature branches that first get merged into develop
after a thorough testing process.
After even more testing - develop branch will get merged into main.
The points when feature branches are merged to develop,
and develop to main
depend entirely on the practice/strategy established in the team.
For example, for smaller projects
(e.g. if you are working alone on a project or in a very small team),
feature branches sometimes get directly merged into main upon testing,
skipping the develop branch step.
In other projects,
the merge into main happens only at the point of making a new software release.
Whichever is the case for you, a good rule of thumb is -
nothing that is broken should be in main.
An example is shown in the diagram below.

An example of Gitflow workflow
Adapted from Git Tutorial by sillevl (Creative Commons Attribution 4.0 International License)
Forking Workflow
The forking workflow is popular among open source software projects and often used in conjunction with a branching model.
The focus of this workflow is to keep the “upstream main” stable while allowing anyone to work on their own contributions independently. Contributions are then suggested and accepted via pull requests. There is not necessarily a develop branch, but you may have release branches.

Source: GitHub
In order to understand the forking workflow, let’s first take a look at some special words and roles needed (we’ve already talked about some of these today!):
-
upstream - Remote repository containing the “true copy”
-
origin - Remote repository containing the forked copy
-
Pull request (PR) - Merge request from fork to upstream (a request to add your suggestions to the “original copy”)
-
Maintainer - Someone with write access to upstream who vets PRs
-
Contributor - Someone who contributes to upstream via PRs
-
Release manager - A maintainer who also oversees releases
Here is some info about workflows used in a couple of projects as real life examples:
Exercise 1: Suggest your changes via pull request
Earlier in this workshop, you pushed a feature branch up to
originin which you had made a small change toplot_buoys.py. Go to your repository (your fork) on GitHub and find the tab called “Pull requests”. Click the green “new pull request” button. Then find and click the blue link uder “Compare changes” called “compare across fork”. Select your username and branch name from the right menus. Then click the big green button under the menus called “Create pull request”.
Key Points
A branching model is a pre-agreed way of merging branches into the main branch.
A branching model is needed when multiple contributors are making changes to a single project.
Merging
Overview
Teaching: 20 min
Exercises: 20 minQuestions
How do I merge a branch changes?
Objectives
Learn about
git merge.
Merging a PR
Let’s use one of the PRs from the last exercise as an example. We can merge this PR via Github by clicking on the ‘Merge pull request’ button. You’ll notice that Github automatically checks whether there are any conflicts and has told us that there are not.
Now, let’s purposefully set up a conflict, to see what that looks like when dealing with a PR on Github. To do this, I’m going to change the colour of the buoy marker in main directly (which we’ve just told you is bad practice!).
Now our PR says that there are conflicts that must be resolved. It’s possible to do this in the web browser and we’ll look at this example there, as it’s small. But in larger and more complicated cases, you might want to deal with it via the command line.
Via the web browser, we are being shown something that looks like:
<<<<<<< feature-branch
buoys_geo.plot(ax=ax, color="blue")
=======
buoys_geo.plot(ax=ax, color="green")
>>>>>>> main
Here, either side of the =======, we have the line of code that is in conflict and we are told that the line above is coming from feature-branch whereas the line below is coming from main. The content above the ======= is usually from the branch being merged into and after is from the branch being merged.
We can simply delete one of these lines, and all of the extra symbols that have been added in. We can then click ‘Mark as resolved’ and then we need to commit the merge.
Now, in our PR, we have an extra commit called ‘Merge branch main into feature-branch’ and we no longer have any conflicts.
Squashing
One other thing to briefly cover while we are talking about PRs is squashing. Squashing allows you to combine multiple commits into just one commit. This makes the history of your repository much simpler and easier to follow, but you are also losing information by doing this and make it harder to track down bugs (among other pros and cons!). Some teams will have development workflows that involve squashing and others won’t, as we discussed last lesson, it’s important to talk to your collaborators about it.
We aren’t going to cover squashing in much detail here, other than how you can squash all of the commits in a branch at the point of merging the branch into main as a PR.
There is a branch of the upstream repo called multiple-commits. If we make a PR for that branch into main, we see that the ‘Merge pull request’ button has a little drop down arrow and one option is ‘Squah and merge’. If we select this, then all three of the commits on this branch are squashed when we merge.
git merge
So far we’ve talked about merging via the web broswer as part of a PR, but there will be other times you want to merge and it’s very useful to be able to do this from the command line as well.
When you are collaborating, you will have to merge a branch independently if your branch may or may not have diverged from the main branch. Most of the Git hosting platform like GiHub or GitLab allows you to merge a branch from their web interface but you can also merge the branches from your machine using git merge.
There are 2 ways to merge:
-
non-fast-forward merge (recommended)
-
fast forward merge
Reminder: when starting work on a new feature, be careful where you branch from! (And make sure that everything is up to date with the remote.)
git switch main
git pull
git branch branch-to-merge
git switch branch-to-merge
Make some small change on branch-to-merge.
git add plot_buoys.py
git commit -m "Some small commit"
Non-fast-forward Merge
Merges branch by creating a merge commit. Prompts for merge commit message. Ideal for merging two branches.
git switch main
git merge --no-ff branch-to-merge -m "Message"
git log -3
The --no-ff flag causes the merge to always create a new commit object, even if the merge could be performed with a fast-forward. This avoids losing information about the historical existence of a feature branch and groups together all commits that together added the feature.
Exercise: Creating a non-fast-forward merge.
In another directory, create a new Git repository that has the following tree.
* 69fac81 (main) Merge branch 'gitignore' |\ | * 5537012 (gitignore) Add .gitignore |/ * 6ec7c0f Add READMESolution
git init touch README.md git add README.md git commit -m 'Add README' git switch -c gitignore touch .gitignore git add .gitignore git commit -m "Add .gitignore" git checkout main git merge --no-ff gitignore
Fast-forward Merge
If there are no conflicts with the main branch, a “fast-forward” merge can be executed with --ff-only. This will NOT create a merge commit! This aborts the merge if it cannot be done.
This is ideal for updating a branch from remote.
git switch main
git pull
git branch branch-to-ff-merge
git switch branch-to-ff-merge
Make some small change on branch-to-ff-merge.
git add plot_buoys.py
git commit -m "Some small commit"
git switch main
git merge --ff-only branch-to-ff-merge
git log -3
If using the fast-forward merge, it is impossible to see from the git history which of the commit objects together have implemented a feature. You would have to manually read all the log messages. Reverting a whole feature (i.e. a group of commits), is a true headache in the latter situation, whereas it is easily done if the –no-ff flag was used.
For a good illustration of fast-forward merge (and other concepts), see this thread.
Exercise: Creating a fast-forward merge.
Consider the following Git tree
* a78b99f (main) Add title | * 3d88062 (remote) Add .gitignore |/ * 86c4247 Add READMEIs possible to run a fast-forward merge to incorporate the branch
remoteintomain?Solution
It is not possible to run a fast-forward merge because of commit
a78b99f.
Three-way Merge
This is similar to --no-ff, but there may be dragons. Forced upon you when there’s an intermediate change since you branched - if you branch to work on a piece of code and in the meantime, that piece of code is changed on main, when you want to merge your branch back to main, you will end up three-way merging.
You may well be prompted you to manually resolve conflicts (as we saw in the example at the start of this episode).
The ‘three’ in three way merging comes from the three versions of the code to consider: the branch you are merging, the branch you are merging into and the common ancestor of the branches.
git merge <branch> [-s <strategy>]
See here for a zillion options (“patience”, “octopus”, etc), But also git is only so smart and you are probably smarter.
See here and here for some discussion of merging strategies.
Note: there are a number of external tools that have a graphical interface to allow for merge conflict resolution. Some of these include: kdiff3 (Windows, Mac, Linux), Meld (Windows, Linux), P4Merge (Windows, Mac, Linux), opendiff (Mac), vimdiff (for Vim users), Beyond Compare, GitHub web interface. We do not endorse any of them and use at your own risk. In any case, using a graphical interface does not substitute for understanding what is happening under the hood.
Honestly, everyone probably ends up with their own way of resolving conflicts that is slightly different to everyone else’s. So let’s have a short example to have a bit of practice:
Exercise: Conflict resolution.
Create a new branch and rename the
plot_buoy_datafunction (in both locations!). Add a comment to the where the function is called from, as well. Commit these changes. Then, merge in the branchupstream/renameand resolve any conflicts.Solution
git pull origin git branch merge-conflict git switch merge-conflictMake changes to
plot_buoys.py.git add plot_buoys.py git commit -m "Some small commit" git merge upstream/renameResolve conflicts!
git add plot_buoys.py git commit -m "Resolve conflicts"
Key Points
git merge --no-ffis the best way to merge changes
git merge --ff-onlyis a good way to pull down changes from remote
Advanced Logging
Overview
Teaching: 15 min
Exercises: 0 minQuestions
How can I find the commits I’m looking for?
Objectives
Learn to search for specific changes
The purpose of any version control system is to record changes to your
code. This gives you the power to go back into your project history to
see who contributed what, figure out where bugs were introduced, and
revert problematic changes. But, having all of this history available
is useless if you don’t know how to navigate it. That’s where the git
log command comes in.
We’ve already encountered the git log command for displaying
commits. But, we can alter this output by passing many different
parameters to git log.
The advanced features of git log can be split into two categories:
formatting how each commit is displayed, and filtering which commits
are included in the output. Together, these two skills give us the
power to go back into your project and find any information that you
could possibly need.
Formatting Log Output
First, let’s take a look at the many ways in which git log’s output
can be formatted. Most of these come in the form of flags that let you
request more or less information from git log.
If you don’t like the default git log format, you can use git
config’s aliasing functionality to create a shortcut for any of the
formatting options discussed below. Please see in The git config
Command for how to set up an alias.
Oneline
The --oneline flag condenses each commit to a single line. By
default, it displays only the commit ID and the first line of the
commit message. If we type
$ git log --oneline
We’ll get output which will look something like this:
116cdda Merge pull request #1 from NOC-OI/create_initial_script
7a760ff Add some basic instructions to the README and credit to the Intermediate Python Course
6c388d0 Tidy up formatting
a62d779 Write first draft of script to plot buoy locations around UK
6d4fb54 Initial commit
This is very useful for getting a high-level overview of your project.
Diffs
The git log command includes many options for displaying diffs with
each commit. Two of the most common options are --stat and -p.
The --stat option displays the number of insertions and deletions to
each file altered by each commit (note that modifying a line is
represented as 1 insertion and 1 deletion).
Let’s try this
$ git log --stat
This is useful when you want a brief summary of the changes introduced by each commit. For example, the following commit added 67 lines to the hello.py file and removed 38 lines:
commit f2a238924e89ca1d4947662928218a06d39068c3
Author: John <john@example.com>
Date: Fri Jun 25 17:30:28 2014 -0500
Add a new feature
hello.py | 105 ++++++++++++++++++++++++-----------------
1 file changed, 67 insertion(+), 38 deletions(-)
The amount of + and - signs next to the file name show the
relative number of changes to each file altered by the commit. This
gives you an idea of where the changes for each commit can be found.
If you want to see the actual changes introduced by each commit, you
can pass the -p option to git log.
$ git log -p
This outputs the entire patch representing that commit:
commit 16b36c697eb2d24302f89aa22d9170dfe609855b
Author: Mary <mary@example.com>
Date: Fri Jun 25 17:31:57 2014 -0500
Fix a bug in the feature
diff --git a/hello.py b/hello.py
index 18ca709..c673b40 100644
--- a/hello.py
+++ b/hello.py
@@ -13,14 +13,14 @@ B
-print("Hello, World!")
+print("Hello, Git!")
For commits with a lot of changes, the resulting output can become quite long and unwieldy. More often than not, if you’re displaying a full patch, you’re probably searching for a specific change. For this, you want to use the pickaxe option.
Graphs
The --graph option draws (using text) a graph representing the
branch structure of the commit history. This is commonly used in
conjunction with the --oneline and --decorate commands to make it
easier to see which commit belongs to which branch:
$ git log --graph --oneline --decorate
For a simple repository with just 2 branches, this will produce the following:
* 116cdda (HEAD -> main, origin/main, origin/HEAD) Merge pull request #1 from NOC-OI/create_initial_script
|\
| * 7a760ff Add some basic instructions to the README and credit to the Intermediate Python Course
| * 6c388d0 Tidy up formatting
| * a62d779 Write first draft of script to plot buoy locations around UK
|/
* 6d4fb54 Initial commit
The asterisk shows which branch the commit was on, so the above graph
tells us that the 7a760ff, 6c388d0 and a62d779 commits are on a topic
branch and the rest are on the master branch.
While this is a nice option for simple repositories, you’re probably better off with a more full-featured visualization tool like gitk or Sourcetree for projects that are heavily branched.
Filtering the Commit History
Formatting how each commit gets displayed is only half the battle of
learning git log. The other half is understanding how to navigate
the commit history. The rest of this episode introduces some of the
advanced ways to pick out specific commits in your project history
using git log. All of these can be combined with any of the formatting
options discussed above.
By Amount
The most basic filtering option for git log is to limit the number
of commits that are displayed. When you’re only interested in the last
few commits, this saves you the trouble of viewing all the commits in
a page.
You can limit git log’s output by including the -<n> option. For
example, the following command will display only the 3 most recent
commits.
$ git log -3
By Date
If you’re looking for a commit from a specific time frame, you can use
the --after or --before flags for filtering commits by date. These
both accept a variety of date formats as a parameter. For example, the
following command only shows commits that were created after July 29th,
2025 (inclusive):
$ git log --after="2025-07-29"
You can also pass in relative references like “1 week ago” and “yesterday”:
$ git log --after="yesterday"
To search for a commits that were created between two dates, you can
provide both a --before and --after date. For instance, to display
all the commits added between July 1st, 2025 and July 29th, 2025, you
would use the following:
$ git log --after="2025-7-1" --before="2025-7-29"
Alternatives
Note that the
--sinceand--untilflags are synonymous with--afterand--before, respectively.
By Author
When you’re only looking for commits created by a particular user, use
the --author flag. This accepts a regular expression, and returns
all commits whose author matches that pattern. If you know exactly who
you’re looking for, you can use a plain old string instead of a
regular expression:
$ git log --author="John"
This displays all commits whose author includes the name John. The author name doesn’t need to be an exact matchit just needs to contain the specified phrase.
You can also use regular expressions to create more complex searches. For example, the following command searches for commits by either Mary or John.
$ git log --author="John\|Mary"
Note that the author’s email is also included with the author’s name, so you can use this option to search by email, too.
If your workflow separates committers from authors, the --committer flag operates in the same fashion.
By Message
To filter commits by their commit message, use the --grep flag. This works just like the --author flag discussed above, but it matches against the commit message instead of the author.
For example, if your team includes relevant issue numbers in each commit message, you can use something like the following to pull out all of the commits related to that issue:
$ git log --grep="JRA-224:"
You can also pass in the -i parameter to git log to make it ignore case differences while pattern matching.
By File
Many times, you’re only interested in changes that happened to a particular file. To show the history related to a file, all you have to do is pass in the file path. For example, the following returns all commits that affected either the foo.py or the bar.py file:
$ git log -- foo.py bar.py
The -- parameter is used to tell git log that subsequent arguments
are file paths and not branch names. If there’s no chance of mixing it
up with a branch, you can omit the --.
By Content (Pickaxe)
It’s also possible to search for commits that introduce or remove a
particular line of source code. This is called a pickaxe, and it takes
the form of -S"<string>". For example, if you want to know when the
string Hello, World! was added to any file in the project, you would
use the following command:
$ git log -S"Hello, World!"
If you want to search using a regular expression instead of a string,
you can use the -G"<regex>" flag instead.
This is a very powerful debugging tool, as it lets you locate all of the commits that affect a particular line of code. It can even show you when a line was copied or moved to another file.
By Range
You can pass a range of commits to git log to show only the commits contained in that range. The range is specified in the following format, where <since> and <until> are commit references:
$ git log <since>..<until>
This command is particularly useful when you use branch references as the parameters. It’s a simple way to show the differences between 2 branches. Consider the following command:
$ git log main..feature
The main..feature range contains all of the commits that are in
the feature branch, but aren’t in the main branch. In other words,
this is how far feature has progressed since it forked off of
main.
Detecting a fork in the history using ranges
Note that if you switch the order of the range (feature..main),
you will get all of the commits in main, but not in feature. If git
log outputs commits for both versions, this tells you that your
history has diverged.
Filtering Merge Commits
By default, git log includes merge commits in its output. But, if
your team has an always-merge policy (that is, you merge upstream
changes into topic branches instead of rebasing the topic branch onto
the upstream branch), you’ll have a lot of extraneous merge commits in
your project history.
You can prevent git log from displaying these merge commits by
passing the --no-merges flag:
$ git log --no-merges
On the other hand, if you’re only interested in the merge commits, you
can use the --merges flag:
$ git log --merges
This returns all commits that have at least two parents.
Summary
You should now be fairly comfortable using git log’s advanced
parameters to format its output and select which commits you want to
display. This gives you the power to pull out exactly what you need
from your project history.
These new skills are an important part of your Git toolkit, but
remember that git log is often used in conjunction other Git
commands. Once you’ve found the commit you’re looking for, you
typically pass it off to git checkout, git revert, or some other
tool for manipulating your commit history. So, be sure to keep on
learning about Git’s advanced features.
Key Points
We’ve been introduced powerful logging commands
Identifying breaking commits
Overview
Teaching: 30 min
Exercises: 10 minQuestions
How can I use git to track down problems in code?
Objectives
Learn to identify when and in what commit problems were introduced
Episode setup
First we need to pull down some code from a remote repository, we will need an example with some broken code
which can be found in the broken branch of our example repository. Note that by default when forking
only the main branch is copied into the forked repository. So unless you ticked the option for including
all the branches when you forked the repository you won’t have the broken branch in your fork.
$ cd ~/Desktop
and clone the code into a directory called intermediate-git-test-repo-upstream
$ git clone git@github.com:NOC-OI/intermediate-git-test-repo.git intermediate-git-test-repo-upstream
and change into the fresh repository and switch to the broken branch.
$ cd intermediate-git-test-repo-upstream
$ git switch broken
Installing packages
This code requires the
matplotlib,pandasandgeopandaspackages to run. If you don’t have this installed, you can install it withpip install matplotlib pandas geopandas.
Tracking down a broken commit
Let’s take a look at the contents of this repository
$ ls
We see a small number of files; let’s have a look inside plot_bouys.py.
$ nano plot_buoys.py
Let’s try to run the code
$ python plot_bouys.py
This clearly has a problem, as expect. Let’s look at the log history to see if we can spot it.
$ git log --oneline
If we looked at this for a while, can could probably spot the commit that might be causing the issue, the commit labelled “changing function to plot_data”. In reality however, finding the problem wouldn’t be this simple. In general, we might not know what file the problem is in, or where in that file. We may have hundreds of files with hundreds of lines each, and no idea where to start looking. Let’s start by looking at the initial commit.
$ git checkout 2890 # This is the number of the commit we want to look at
And see if the plot_buoys.py script runs here.
$ python plot_buoys.py
The file runs with no problems from an earlier commit, somewhere since this commit something went wrong. In this section, we will explore ways in which we can investigate the sources of errors.
Let’s move back to the head of the broken branch.
$ git checkout broken
Tracking down broken commits with git blame
If we know where the problem is in the file, we might ask ourselves what (and who) introduced this problem. What commit introduced this line. Let’s try this with
$ git blame plot_buoys.py
We see that most lines were created in the same two commits, but some were modified in other commits. There are a lot of lines here, let’s focus on the range of lines 57 to 61 (the part not in a function)
$ git blame -L 57,61 plot_buoys.py
That’s better. Let’s take a closer look at the commit on line 61.
$ git show 4445
That’s interesting. We have found a change to that line, but not the one which
altered the function name. Let’s try going back a bit in the history with git checkout and do this again.
$ git checkout HEAD~1
$ git blame -L 57,61 plot_buoys.py
This still hasn’t found the commit which renamed the function, let’s try going back further.
$ git checkout HEAD~1
$ git blame -L 57,61 plot_buoys.py
We can see that the problematic line was brought in during commit eecf.
Multiple commits after something breaks can make git blame a little harder to use.
Challenge: Using git blame across files
We can ask
git blameto attempt to track changes across files. For example where code is copied and pasted from one file to another or where files are renamed usinggit mv. We can do this by specifying the-Coption togit blame. Usegit blame -Cto identify which lines ofplot_buoys.pycame from another file. Then usegit showorgit checkoutto examine the contents of this file.Solution
$ git blame -C plot_buoys.pyThis came from description.txt in commit
73592708. We can examine this commit with:$ git show 7359or
$ git checkout 7359 $ cat description.txt $ git checkout broken #get back to the head of the branch
Binary searching with Git
We could checkout each commit one at a time, and check each one, but this is very time consuming. We’d have to check out each commit one at a time, like this
$ git checkout HEAD~7
$ git checkout HEAD~6
$ git checkout HEAD~5
...
$ git checkout HEAD~3
$ git checkout HEAD~2
$ git checkout HEAD~1
We can do better than this if we choose a half way point between the
bad and good commit, check if that is good or bad, and keep choosing a
half way point until we find the commit that causes the code to go
from good to bad. Git can actually help us do this with the git
bisect command. Let’s try it, first let’s make sure we have reset
HEAD to the most recent commit on the broken branch.
$ git checkout broken
$ git bisect start
We mark the current commit as bad
$ git bisect bad HEAD
Then we can mark the commit from the merge as good
$ git bisect good 116c
Git will now drop us at a commit half way between the good and the bad commits, which should be commit 2890. We can verify this with
$ git log --oneline broken
We see some commits marked as bad and good, and git has placed us in the middle commit. Now we can test this commit
$ python plot_buoys.py
It works! The code wasn’t broken at this point. Let’s mark this commit as good
$ git bisect good
Great, git has moved us again. Let’s check where we are this time, it should be commit d022
$ git log --oneline broken
The markers for good and bad have moved, because we’ve given bisect more information, and HEAD has been placed between them.
$ python plot_buoys.py
This failed, let’s mark this as a bad commit
$ git bisect bad
We found a bad commit, let’s take a look at where we are now:
$ git log --oneline master
Git has marked the good and bad commits, but it doesn’t know yet if the previous commit might have been the first bad one. It needs us to check that. Let’s go ahead and do that
$ python plot_buoys.py
This is also a bad commit, let’s mark it
$ git bisect bad
We’ve now only got one commit left so Git automatically identifies the commit which broke things as eecf. Had we marked our good commit one commit earlier then
we could have used git bisect good when we came across the first good commit.
Finally, git has found the commit we were looking for and told us where it is. Let’s see where we are
$ git log --oneline master
Git has marked the relevant commits as bad, but it hasn’t moved us to the first bad commit. It left us in this pending state. Let’s take a look at the content of the breaking commit
$ git show eecf
Git is telling us that the problem was introduced by a change that
happened on line 55 of plot_buoys.py where plot_buoy_data() was changed to
plot_data(). For us, this was probably a problem that is easy enough to
resolve without using bisect, but for a large complex code base when
we don’t know where to start, bisect can instantly point us to the
change which first caused the problem. Let’s exit the bisect state and
go back to master with
$ git bisect reset
This worked great, and we can go through large numbers of commits with this technique, but there was a lot of typing. Can Git do a better job? It turns out that it can. Let’s look at the return value from Python
$ python plot_buoys.py
$ echo $?
The variable $? is a special variable containing the return value of
the function. In this case it is non-zero, indicating an error. Let’s
look at the historic commit
$ git log --oneline
$ git checkout 2890
And test the code
$ python plot_buoys.py
$ echo $?
In this case the script returns 0, indicating success. This is a common convention in Unix scripts, and you can write your own scripts that follow this convention. Git can use this convention to decide if a commit is good or bad. Let’s try it
$ git bisect start HEAD 2890
Once again, git drops us in the middle of a commit. This time, instead
of running python plot_buoys.py, we tell Git to run it for us
$ git bisect run 'python plot_buoys.py'
Git does all the boring work for us. Every time it runs the command we gave and gets a zero return value, it marks the commit as good, every time it sees a non-zero value, it marks the commit as bad. It then tells us the first commit if finds which changes the state of the repository from “good” to “bad”. Now that we’re done, we exit again with
$ git bisect reset
One caveat
This is a very powerful debugging tool, but it relies on all your code being in a runnable state, such that Git can automatically identify when this state changes. It works best when used with a branching and merging strategy, to ensure there are no breaking commits on the main branch.
Key Points
git blamecan identify when a problem line was introduced.
git bisectcan be used to binary search through git history to identify lines which first introduced a problem.
Undoing Changes
Overview
Teaching: 20 min
Exercises: 30 minQuestions
I’ve just made a mistake, how can I undo it?
Objectives
How do I roll back a single change?
How do I get back to a specific state?
Be able to manipulate the content of the worktree, staging area and commit
Be able to change the last in a branch
Understand HEAD and the latest commit
Be able to move to historical states of the repository
Setup a repository for the episode
Before we can proceed we need to create a branch with some commits that we will undo in various different ways.
Exercise: Creating a branch.
- Create a new branch called
hotfix. Create a new file and make 3-4 commits in that file or create 3-4 new files. Check the log to see the hash of the last commit.Solution
git switch -c hotfix #or git checkout -b hotfix touch a.txt git add a.txt git commit -m "creating a.txt" touch b.txt git add b.txt git commit -m "creating b.txt" touch c.txt git add c.txt git commit -m "creating c.txt" git status git log --oneline
Amending the last Git Commit
Amending the commit message
Sometimes we make a mistake with the message in a commit we just wrote. This can be fixed by adding the --amend option to git commit -m.
git commit --amend -m "new commit message"
Note that this only works on the last commit, if you need to change something more than one commit ago then things get more complicated.
We (ideally) need to do this correction before pushing the commit to a remote. If we have a pushed first we will receive an error:
git push origin hotfix
git commit --ammend -m "creating c.txt"
git push origin hotfix
We can override this by “forcing” the push, but this has complications because running git commit --amend changes the hash of the last commit.
If somebody else has cloned the repository then they are going to have to deal with the missing commit when they next pull. For this reason
it is best to avoid amending commits once you have pushed them as this is effectively rewriting the history.
Git Revert
Reverting undoes a commit by creating a new commit. This is a safe way to undo changes, as it has no chance of re-writing the commit history. For example, the following command will figure out the changes contained in the 2nd to last commit, create a new commit undoing those changes, and tack the new commit onto the existing project.
git revert HEAD~1
ls
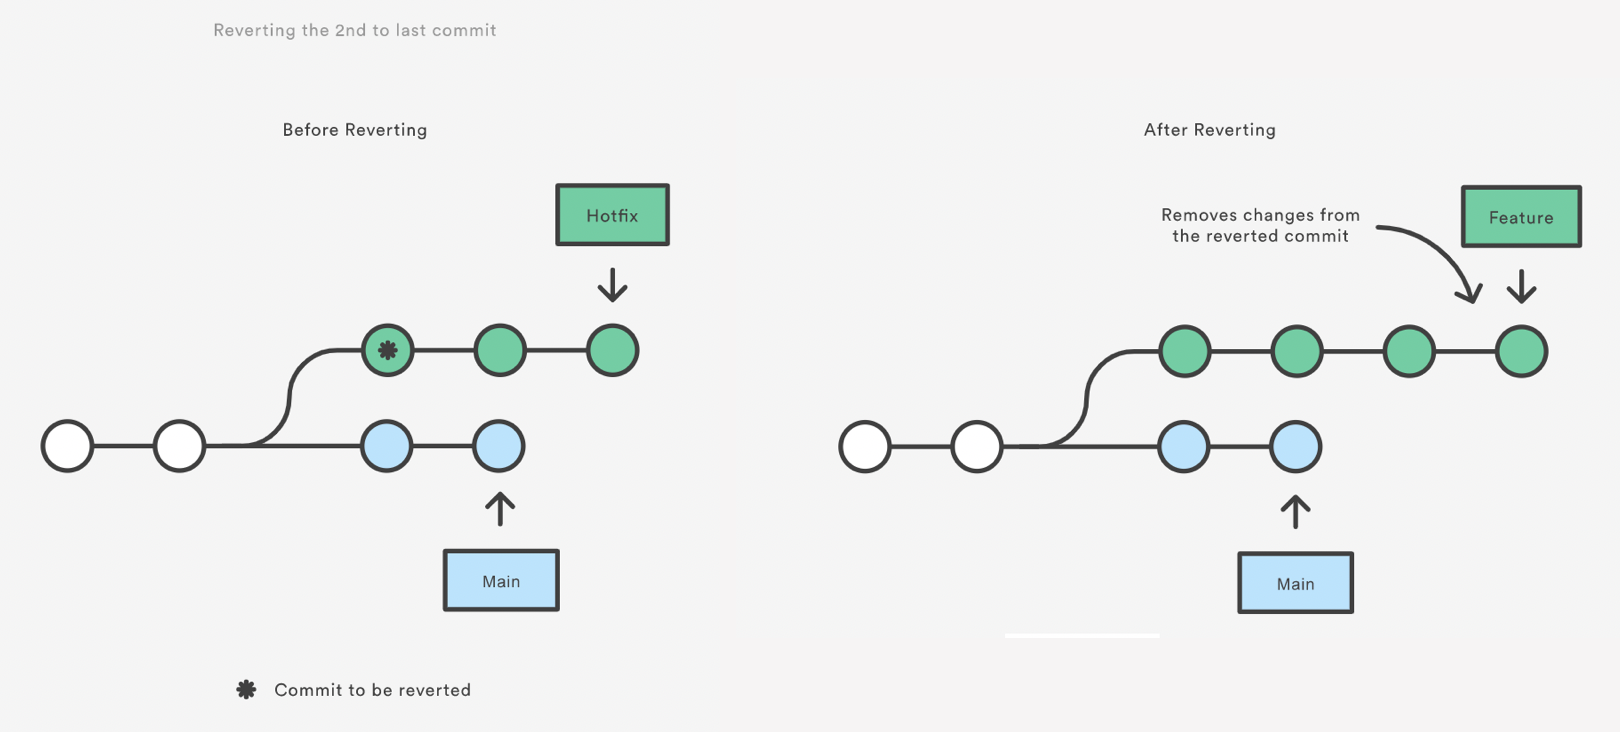
Note that revert only backs out the atomic changes of the ONE specific commit (by default, you can also give it a range of commits but we are not going to do that here, see the help).
git revert does not rewrite history which is why it is the preferred way of
dealing with issues when the changes have already been pushed to a remote
repository.
Git Reset
Resetting is a way to move the tip of a branch to a different commit. This can
be used to remove commits from the current branch. For example, the following
command moves the hotfix branch backwards by two commits.
git checkout hotfix
git reset HEAD~1
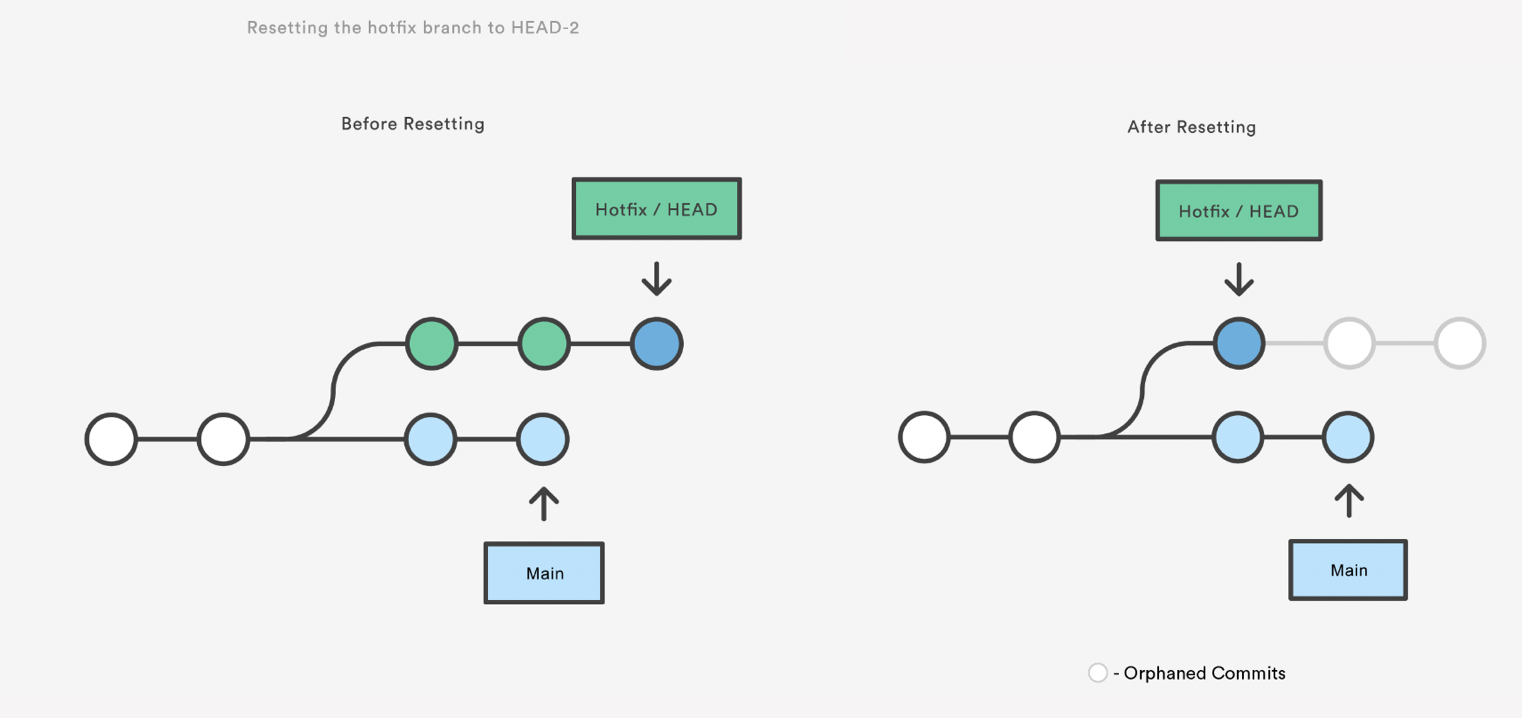
The two commits that were on the end of hotfix are now dangling, or orphaned commits.
This means they will be deleted the next time git performs a garbage collection.
In other words, you’re saying that you want to throw away these commits.
git reset also reverts the commits but leaves the uncommitted changes in the repo.
git status
git restore b.txt
git reset is a simple way to undo changes that haven’t been shared with anyone
else. It’s your go-to command when you’ve started working on a feature and find
yourself thinking, “Oh no, what am I doing? I should just start over.”
Using git reset on uncommitted files
In addition to moving the current branch, you can also get git reset to alter
the staged snapshot and/or the working directory by passing it one of the following flags:
–soft – The staged snapshot and working directory are not altered in any way.
–mixed – The staged snapshot is updated to match the specified commit, but the working directory is not affected. This is the default option.
–hard – The staged snapshot and the working directory are both updated to match the specified commit.
It’s easier to think of these modes as defining the scope of a git reset operation.
To just undo any uncommitted changes:
git status
git add c.txt
git status
git reset HEAD
git status
Use git restore instead of git reset for staged but uncommmitted files
The newer git restore command (as suggested by git status) can also be used
here, but you need to specify which files to unstage and that you want to unstage.
git status
git add c.txt
git restore --staged c.txt
git status
You can add and commit the changes or restore the file.
Reset a single committed file
git reset can also work on a single file:
Let’s first add some contents to our three text files.
echo "a" > a.txt
echo "b" > b.txt
echo "c" > c.txt
git add a.txt b.txt c.txt
git commit -m "added some file contents"
Now if we want to restore just one of these files to it’s previous (empty)
state we can specify it to git reset.
git reset HEAD~1 b.txt
git status
Git Checkout: A Gentle Way
We already saw that git checkout is used to move to a different branch but is
can also be used to update the state of the repository to a specific point in
the projects history.
git checkout hotfix
git checkout HEAD~2

This puts you in a detached HEAD state. AGHRRR!
Most of the time, HEAD points to a branch name. When you add a new commit, your branch reference is updated to point to it, but HEAD remains the same. When you change branches, HEAD is updated to point to the branch you’ve switched to. All of that means that, in these scenarios, HEAD is synonymous with “the last commit in the current branch.” This is the normal state, in which HEAD is attached to a branch.
The detached HEAD state is when HEAD is pointing directly to a commit instead of a branch. This is really useful because it allows you to go to a previous point in the project’s history. You can also make changes here and see how they affect the project.
echo "Welcome to the alternate timeline, Morty!" > new-file.txt
git add new-file.txt
git commit -m "Create new file"
echo "Another line" >> new-file.txt
git commit -a -m "Add a new line to the file"
git log --oneline
If we want to keep the changes we can create another branch for them.
git branch alt-history
git checkout alt-history
If we didn’t want the changes then we can discard them and recover by switching back to the hotfix branch:
git checkout hotfix
https://www.atlassian.com/git/tutorials/resetting-checking-out-and-reverting Also OMG: http://blog.kfish.org/2010/04/git-lola.html
Exercise: Undoing Changes
- Create a new branch called
hotfix. Create a new file and make 3-4 commits in that file. Check the log to see the hash of the last commit.Solution
git status
git log
- Revert the last commit that we just inserted. Check the history.
Solution
git revert -m 1 <hash>
git log
- Completely throw away the last two commits [DANGER ZONE!!!]. Check the status and the log.
Solution
git reset HEAD~2 --hard
git status
git log
- Undo another commit but leave it in the staging area. Check the status and log.
Solution
git reset HEAD~1
git status
git log
- Wrap it up: add and commit the changes.
Solution
git add .
git commit -m "Message"
Comparing hard, mixed and soft resets
So far we’ve been using the default “mixed” option for git reset. This leaves
the working directory alone and puts the files affected into the working directory.
As a reminder let’s recreate our three text files, commit them and then reset the commit to HEAD~1.
touch a.txt b.txt c.txt
git add a.txt b.txt c.txt
git commit -m "adding text files"
git reset --mixed HEAD~1
Let’s check what’s in the working directory and see what git status says.
ls
git status
and finally let’s confirm the commit is no longer there by looking at git log --oneline.
Now let’s repeat the process but this time we’ll do a soft reset. This should
leave the files staged when we run git status.
git add a.txt b.txt c.txt
git commit -m "adding text files"
git reset --soft HEAD~1
git status
Finally let’s try a hard reset. This time the files will be completely deleted
from the working directory and the repository. Since the soft reset left the
files staged there’s no need to do a git add this time.
git commit -m "adding text files"
git reset --hard HEAD~1
git status
ls
This time we see no evidence that these file ever existed, they are gone from the working directory, staging area and repository.
Challenge: When to use which type of reset?
Which reset should you use in the following scenarios:
- You have made three commits for three small changes and would prefer they were one bigger commit.
- You committed a file that you thought fixed a bug but realised soon after that you made a small mistake. You would like to fix the mistake but have the fix as a single commit.
- You have committed a file which was accidentally placed in your Git working directory and should have never been there.
Solution
- soft, we are assuming we do
git reset HEAD~3, all three files are now placed in the staging area and a single new commit will commit all three together.- mixed, as we need to make some changes after resetting the commit we don’t want the file added to the staging area. Although we could do a soft reset followed by another
git add.- hard, since we don’t want to keep the file after the reset.
Back in time
You can restrict the action of reset to a file with:
git reset -- filenameMake some changes to a file, add that file to the staging area, and use git reset to undo the action of git add.
Solution
Add changes to a file with
$ git add <file>then reset the files with
$ git reset -- <file>or
$ git reset HEAD -- <file>or
git reset HEAD -- <file>Note how if we leave out HEAD, then git will assume we want to pull from the HEAD reference by default.
Without a HEAD
What happens if we do a hard reset, but leave out the place to copy files from, like this
$ git reset --hardCan you work out where the files come from Hint: it may help to make some changes to the files in the current directory first.
Solution
If the origin of the files is not specified, it is assumed to be HEAD by default.
Checkout on files
The checkout command from earlier has an important variant when passed files as arguments. In this case they behaves very differently. Let’s reset our repository to the way it is on the remote server to begin with.
$ git reset --hard origin/main
Let’s make two changes, one to plot_buoys.py and one to README.md. In both
cases add a line to the file listing yourself as an author of the file. In
the Python file this will need to be a comment. Go ahead and add/commit both
changes in a single commit.
$ nano README.md
$ nano plot_buoys.py
$ git add README.md plot_buoys.py
$ git commit -m "Adding author information"
Now, let’s perform a checkout, specifying that we’d like the last version of the Python file.
$ git checkout HEAD~1 -- plot_buoys.py
What happened? Previously checkout would have moved HEAD.
$ git log --oneline
We’re still on the same commit, HEAD hasn’t moved at all this time. It doesn’t make sense to move HEAD for some files and keep it in the same place for others, that would get confusing very quickly. Only the file copy operations have been performed. Let’s see what effect this has had.
$ git status
The file plot_buoys.py has been copied from the previous commit HEAD~1
into both our working directory as well and into the staging area.
We can verify the changes with
$ git diff --staged
The file plot_buoys.py has changed and nothing else has. In this case git
checkout with a file behaves very much like we would expect git reset --hard
to behave with files. It overrides the file in the staging area and working
directory and resets any changes. For this reason
$ git reset --hard HEAD~1 -- plot_buoys.py
This is not a valid command, since it would perform the same operation as the git checkout command.
Reset with files
Using git reset with files allow us to copy specific files to and from the staging area, leaving the working directory unchanged.
Let’s reset our repository to the way it was at the beginning of this lesson
$ git reset --hard origin/main
Let’s make some changes to README.md
$ nano README.md
and copy them to the staging area.
$ git add README.md
$ git status
We can use git reset to copy the version in the repository back, effectively undoing the add.
We can unstage the file with
$ git reset HEAD -- README.md
More recently (as of Git 2.23 in August 2019) the git restore command has been
introduced which can also be used to unstage changes and is suggested by
git status. Older versions of git suggested the use of git reset.
The equivalent git restore command for the above would have been:
$ git restore README.md
But you may still find a lot of Git tutorials suggesting the use of git reset
in this scenario. Either command will work.
The dangers of checkout
What happens if you make some modification to README.md, add these changes to the staging area with
$ git add README.mdand then try to checkout the file with
$ git checkout HEAD -- README.mdCan you guess what will happen? Is this potentially dangerous to do?
Solution
The command
$ git checkout HEAD -- <filename>will overwrite the file filename, even if there are changes. Be careful as you can lose your changes in this way. This command is a useful way to undo any changes you may have made to the files in your working directory.
The way things were
Can you use the checkout command to create a commit which contains the file README.md as it was 3 commits ago? Hint: because some work in the history was done on a pull request HEAD~3 might not get what you expect, use the commit hash instead.
Solution
HEAD~1 actually takes us all the way back to the first commit in the repository, even though there are 3 prior commits in the history.
git log --graph --onelinewill reveal that some of the history came from another branch and using HEAD~N doesn’t cover the commits from the branch, but treats them as if they were one commit. Let’s usegit logto find a commit hash instead.$ git log --oneline 116cdda (HEAD -> main, origin/main, origin/HEAD, hotfix) Merge pull request #1 from NOC-OI/create_initial_script 7a760ff Add some basic instructions to the README and credit to the Intermediate Python Course 6c388d0 Tidy up formatting a62d779 Write first draft of script to plot buoy locations around UK 6d4fb54 Initial commitSo let’s take commit hash a62d instead. The file can be brought into the current directory with
$ git checkout 6b4f -- README.mdAll that remains is to create a new commit, with a command such as
$ git commit -m 'README.md as it was 3 commits ago'
Without a HEAD
Can you work out what the following command does
$ git checkout -- README.mdHint: try making some changes to README.md and running the command.
Solution
This command will revert the file README.md to the state it is in the current commit. This is equivalent to running
$ git checkout HEAD -- README.mdIf the commit is not specified, git defaults to using HEAD.
Key Points
git revertundoes a commit by creating a new commit.
git revertshould be used to undo changes on a public branch or changes that have already been pushed remotely.
git revertonly backs out a single commit or a range of commits.
git resetrolls back the commits and leaves the changes in the files
git reset --hardroll back and delete all changes
git resetalters the history of the project.You should use
git resetto undo local changes that have not been pushed to a remote repository.
git restorecan restore a file in the working directory to it’s state from the repository.
git restore --stagedcan remove a file from the staging area but leaves it in the working directory.
git restoreis a newer command andgit resetcan be used to do many of the same operations, butgit restorehas a simpler syntax.
git checkout <commit ID>can be used to move the repository back to an earlier commit.
git checkout <commit ID> -- <filename>can restore an individual file from an earlier commit
Tags
Overview
Teaching: 10 min
Exercises: 0 minQuestions
How can I flag a specific state of the project?
Objectives
Learning about the
git tagcommand
A tag is a marker of a specific commit in the project history. You can think of it as a permanent bookmark. Tags can be created to point to a release version, a major code change, a state of the code that was used to produce a paper or a data release, or any other event you (or the development team) may want to reference in the future.
Once a tag has been created, no other changes can be added to it. But you can delete it and create a new one with the same name.
Don’t name your tags the same as your branches. Or the other way around. git fetch can get a tag or a branch and that can be confusing.
The command that allows you to handle git tags is just git tag. Without any flags it simply list the existing tags:
git tag
You can create a new tag based on the current state of the repository by providing a tag name to the git tag command:
git tag 1.0.0
This however creates what is called a lightweight tag. Lightweight tags are like a branch that doesn’t change.
You can get information on a tag via git show:
git show 1.0.0
Lightweight tags are not recommended in most use cases because they do not save all the information. Instead, use annotated tags (see here for more information). They are stored as full objects in the Git database: they’re checksummed; contain the tagger name, email, and date; have a tagging message; and can be signed and verified with GNU Privacy Guard (GPG).
To create an annotated tag from the current commit:
git tag -a 2.0.0 -m <message>
It is also possible to tag a past commit by providing that commit’s hash:
git tag -a <tag> [<hash>] -m <message>
To get more information about an existing tag you can “verify” it, which displays that tag’s details, including the tagger, date, and message. This only works for annotated commits:
# this will fail
git tag -v 1.0.0

# this will work
git tag -v 2.0.0
A tag allows you to switch to the version of the code that was tagged, to use that version of the code, or to see what the code looked at that tag. Here is how to check out a state of the code that has been tagged:
git checkout <tag>
Push a tag to origin:
git push origin <tag>
And of course you can delete a tag. This does not delete the commit, just removes the marker/lable. Delete a tag:
git tag -d <tag>
Since tags are frequently used to do releases, it is useful to be aware that codebases and languages have standards on how release versions should be labled. If you are working with an existing code base, follow the standard set by the dev team. If you are developing a library by yourself, follow the standards for the language. For example, the Python Packaging Authority (and previously PEP440) specifies the scheme for identifying versions for python libraries.
Referring to Commits
We’ve seen a bunch of different type of arguments passed to commands such as git checkout. For example, references to HEAD
$ git log -1 HEAD
or an ancestry reference
$ git log HEAD~3
or to a local branch
$ git log -1 main
or a remote branch
$ git log -1 origin/main
or a tagged commit
$ git log -1 0.4.1
or an abbreviated commit ID
$ git log -1 1ffb
Git is clever about allow you to use any way is most convenient, and will ultimately (in most cases) translate them all to a commit reference behind the scenes.
Key Points
git tagallows us to mark a point we can return to.A tag is tied to a commit.
Issue Tracking
Overview
Teaching: 10 min
Exercises: 10 minQuestions
How do we track issues with code in GitHub?
Objectives
Understand how to track issues with code in GitHub.
Introduction
The strength of online collaboration platforms such as GitHub does not just lie in the ability to share code. They also allow us to track problems with that code, for multiple developers to work on it independently and bring their changes together and to review those changes before they are accepted.
Tracking issues with code
A key feature of GitHub (as opposed to Git itself) is the issue tracker. This provides us with a place to keep track of any problems or bugs in the code and to discuss them with other developers. Sometimes advanced users will also use issue trackers of public projects to report problems they are having (and sometimes this is misused by users seeking help using documented features of the program).
The broken branch of the code from the identifying breaking commits chapter earlier has a bug with a mismatched function name in plot_buoys.py.
Let’s go ahead and create a new issue in our forked GitHub repository to describe this problem. We can find the issue tracker on the “Issues” tab in the top left of the GitHub page for the repository.
Issue tracker missing in Github
Sometimes when forking a Github repository the issue tracker is disabled. If you do not see an “Issues” tab in your fork of the repository then you can re-enable it by:
- Clicking on the Setting button (cog icon in the middle near the top)
- Scroll down to the Features section
- Tick the Issues box
An Issues tab should now appear on the toolbar near the top of the screen.
Click on this and then click on the green “New Issue” button on the right hand side of the screen. We can then enter a title and description of our issue.
A good issue description should include:
- What the problem is, including any error messages that are displayed.
- What version of the software it occurred with.
- Any relevant information about the system running it, for example the operating system being used.
- Versions of any dependent libraries.
- How to reproduce it.
After the issue is created it will be assigned a sequential ID number.
Write an issue to describe our bug
Create a new issue in your repository’s issue tracker by doing the following:
- Go to the GitHub webpage for your code
- Click on the Issues tab
- Click on the “New issue” button
- Enter a title and description for the issue
- Click the “Submit Issue” button to create the issue.
Discussing an issue
Once the issue is created, further discussion can take place with additional comments. These can include code snippets and file attachments such as screenshots or logfiles. We can also reference other issues by writing a # symbol and the number of the other issue. This is sometimes used to identify related issues or if an issue is a duplicate.
Closing an issue
Once an issue is solved then it can be closed. This can be done either by pressing the “Close” button in the GitHub web interface or by making a commit which includes the word “fixes”, “fixed”, “close”, “closed” or “closes” followed by a # symbol and the issue number.
Challenge: Fix and close an issue
Fix the issue of the function name mismatch on the broken branch. You could do this either by renaming the function or changing the call. Commit your changes and add the appropriate text to your commit message to close the issue. Push your changes to your forked repository on Github. Check the issue tracker and ensure it has closed.
Solution
def plot_buoy_data(figure_name):Becomes
def plot_data(figure_name):or
plot_data("bouys_plot.png")Becomes
plot_buoy_data("bouys_plot.png")git commit -m "Correcting function name mismatch, Fixes #1" git push
Key Points
Github includes an issue tracker for each repository where people can describe and discuss issues with code.
Issues can be opened, commented on and closed from the Github web interface.
Issues can also be closed in a commit message using ‘fixes’, ‘fixed’, ‘close’, ‘closed’ or ‘closes’ followed by a # symbol and the issue number.
Using Large Files in Git
Overview
Teaching: 10 min
Exercises: 5 minQuestions
Why are (large) binary files a problem in Git?
What is Git LFS?
What are the problems with Git LFS?
Objectives
Understanding that Git is not intended for (large) binary files
Learning about the
git lfscommandsUnderstanding the disadvantages of
git lfs
Sometimes, you might want to add non-textual data to your Git repositories. Examples for such uses cases in a software project are:
- assets for the project documentation like images
- test data for your test suite
- example datasets
However, such data is stored in binary formats most of the time. Git’s line-based
approach of tracking changes is not suited for this type of data. While Git will
work with binary data without any errors, it will internally treat each binary file
as a file with one (very long) single line of content. Consequently, if you apply
changes to such a file, Git will store the entire file in the commit even if there
was a lot of similarity between the two versions of the file. As Git does not “forget”
about previous versions of the file, doing this repeatedly and/or with very large
files will quickly make your repository grow in size. At some point this will
severely impact the performance of all your Git operations from git clone to even
git status. It is therefore generally discouraged to use Git to track (large) binary files.
However, the problem of binary files in Git repositories cannot be fully neglected: There is a lot of value for a software project in keeping things together that belong together: Documentation assets belong to the documention they are part of. Therefore we will now explore some options on how to integrate large file handling into Git.
The git lfs subcommand is part of an extension to Git. LFS stands for Large
File Storage. It allows you to mark individual files as being large.
Git does not apply its normal, line-based approach to tracking changes to these
large files, instead they are stored separately and only referenced in the Git data
model. During push and pull operations, large files are transmitted separately -
requiring the server to support this operation.
For the sake of demonstration, we create a file called report.pdf. We assume that it
is a large, binary file in order to show how to handle it with git lfs:
echo "This is a very large report." > report.pdf
Next, we tell Git, that this file should be treated with LFS:
git lfs track report.pdf
Tracking "report.pdf"
Having done so, we can inspect the repository and we learn that a new file .gitattributes
was added to the repository.
git status
On branch main

Untracked files:
  (use "git add <file>..." to include in what will be committed)
	.gitattributes
	report.pdf
cat .gitattributes
report.pdf filter=lfs diff=lfs merge=lfs -text
Similar to .gitignore this file is part of the repository
itself in order to share it with all your collaborators on this project.
We therefore craft a commit that contains it:
git add .gitattributes
git commit -m "Setup LFS tracking"
Now, we are ready to add the large file to the repository the same way we would with any other file:
git add report.pdf
git commit -m "Add final report to the repository"
Pushing our commits to the remote repository, we can see in the console output, that our LFS data was transferred to the remote server separately.
git push origin main
Uploading LFS objects: 100% (1/1), 17 B | 0 B/s, done.
Tracking with wildcard patterns
LFS tracking is not limited to explicitly spelled out filenames. Instead, wildcard patterns can be passed to
git lfs track. However, you should be careful to quote these patterns, as they might otherwise get expanded by to existing files by your shell. For example, tracking all PDFs with LFS could be achieved with the following command:git lfs track "*.pdf"
Disadvantages of Git LFS
Although
git lfsby design solves the problem of storing large files in Git repositories, there are some practical hurdles that you should consider before introducing LFS into your project:
- The
git lfscommand is a separately maintained extension to the Git core. It is therefore not part of most Git distributions, but needs to be installed separately. Using it in your project will require you to educate your users about LFS and how to install it. Depending on your target audience, you should carefully consider whether the benefits outweigh this disadvantage.- Users that do not have
git lfsinstalled will not be notified by Git. They will see the files, but the content will be Git metadata instead of the actual content. Trying to work with those files will typically produce cryptic error messages.- Some hosting providers - most notably GitHub - apply restrictive quotas to LFS storage. On the free plan, GitHub currently allows 1GB of storage and 1 GB bandwidth per month. As the bandwidth quota counts every single clone by users, LFS should currently be considered unusable on the GitHub free plan.
Challenge: Add your images into Git LFS
When the
plot_buoys.pyscript is run it produces a PNG file (buoys_plot.png).Try and do the following:
- Add all PNG files to Git LFS.
- Commit the updated .gitattributes file.
- Add, commit and push
buoys_plot.pngto your Github repository.- Find the file in Github’s web interface. Can you confirm if it has used LFS?
Solution
git lfs track "*.png"
git commit .gitattributes -m "using Git LFS for PNG files"
git add buoys_plot.png
git commit -m "adding example output image"
git push
When viewing the image on Github’s website it should say “Stored with Git LFS”
Key Points
(Large) binary files can grow the repository size immensely and make it unusable
git lfsis an extension that stores large files outside the Git data modelUse of Git LFS is discouraged in many scenarios.
Publishing and Citing Code
Overview
Teaching: 20 min
Exercises: 20 minQuestions
How do I ensure my code is citable?
Objectives
Understand how to archive code to Zenodo and create a digital object identifier (DOI) for a software project (and include that info in CITATION.cff).
Open Source Licensing
Copyright allows a creator of work (such as written text, photographs, films, music, software code) to state that they own the work they have created. Copyright is automatically implied - even if the creator does not explicitly assert it, copyright of the work exists from the moment of creation. A licence is a legal document which sets down the terms under which the creator is releasing what they have created for others to use, modify, extend or exploit.
Because any creative work is copyrighted the moment it is created, even without any kind of licence agreement, it is important to state the terms under which software can be reused. The lack of a licence for your software implies that no one can reuse the software at all - hence it is imperative you declare it. A common way to declare your copyright of a piece of software and the license you are distributing it under is to include a file called LICENSE in the root directory of your code repository.
Copyleft and Permissive Licenses
Open Source licenses are a form of Copyright license that exist to keep the source code of software freely available, redistributable, modifiable and reusable. There are broadly two classes on open source licenses:
-
Copyleft Licenses - These require that any subsequent changes to the program are also released under a similar license. This can help to ensure that any subsequent improvements to the code are made available to the wider community. But sometimes this can worry commercial users who would have to release the source of their entire program if they combined your code with theirs.
-
Permissive Licenses - These do not require that subsequent changes to the program are released under a similar license, but usually require a Copyright statement saying that code has been reused from the original source code. This means the code can be incorporated into commercial software without that software itself needing to be released under an open source license. This can help encourage uptake across a wider community of users but might mean that derivative works are created without contributing back the source code of their improvements to the community.
Common examples of Copyleft licenses include the GNU Public License also known as the GPL. Common copylet licenses include the MIT and Apache 2 licenses.
Choosing a License
If you would like help choosing a license then choosealicense.com will help you find a common license that suits your needs. Important considerations include:
- Whether you want to address patent rights.
- Whether you require people distributing derivative works to also distribute their source code.
- Whether the content you are licensing is source code.
- Whether you want to license the code at all.
Choosing a license that is in common use makes life easier for contributors and users, because they are more likely to already be familiar with the license and don’t have to wade through a bunch of jargon to decide if they’re ok with it. The Open Source Initiative and Free Software Foundation both maintain lists of licenses which are good choices.
This article provides an excellent overview of licensing and licensing options from the perspective of scientists who also write code.
Adding a LICENSE file
Typically we let users know what license a program is distributed under by adding a LICENSE file to the Git repository. This file will contain the text of the chosen license. In case the source files are distributed individually it can also be helpful to add a comment to every source file stating who owns the Copyright, which license it is distributed under and where to find the full text (e.g. the repository’s LICENSE file or a URL to the license text) of the license.
If you create an empty Github repository using Github’s web interface then Github will offer you a choice of licenses as part of the repository creation process.
Challenge: Add a license file to your repository
Use choosealicense.com to pick an open source license you are happy with. Create a file called LICENSE in your repository and add the text of your chosen license to this. Add a comment to the top of
plot_bouys.pystating which license you have chosen and where to find the text of it.
Making the code public
By default repositories created on GitHub are private and only their creator can see them. Since we added an open source license to our repository we probably want to make sure people can actually access it.
To make your repository public, if it is not already, go to your repository on GitHub and click on
the Settings link near the top right corner.
Then scroll down to the bottom of the page and the “Danger Zone” settings. Click on “Change Visibility” and you
should see a message saying “Change to public”.
If it says “Change to private” then the repository is already public.
You will then be asked to confirm that you indeed want to make the repository public and agree
to the warning that the code will now be publicly visible.
As a security measure, you will then have to put in your GitHub password.
Transferring to an organisation
Currently our repository is under the GitHub “namespace” of our individual user. This is OK for individual projects where we are the sole or at least the main code author, but for bigger and more complex projects it is common to use a GitHub organisation named after our project. If we are a member of an organisation and have the appropriate permissions then we can transfer a repository from our personal namespace to the organisation’s. This can be done with another option in the “Danger Zone” settings, the “Transfer ownership” button. Pressing this will then prompt us as to which organisation we want to transfer the repository to.
Citing Code
CITATION file
We should add a citation file to our repository to provide instructions on how to cite our code. A citation file can be a plain text (CITATION.txt) or a Markdown file (CITATION.md), but there are certain benefits to using use a special file format called the Citation File Format (CFF), which provides a way to include richer metadata about code (or datasets) we want to cite, making it easy for both humans and machines to use this information.
Why use CFF?
For developers, using a CFF file can help to automate the process of publishing new releases on Zenodo via GitHub. GitHub also “understands” CFF, and will display citation information prominently on the landing page of a repository that contains citation info in CFF.
For users, having a CFF file makes it easy to cite the software or dataset with formatted citation information available for copy+paste and direct import from GitHub into reference managers like Zotero.
CFF file format
A CFF file is using the YAML key-value pair format. At a minimum a CFF file must contain the title of the software/data, the type of asset (software or data) and at least one author:
# This CITATION.cff file was generated with cffinit.
# Visit https://bit.ly/cffinit to generate yours today!
cff-version: 1.2.0
title: My Software
message: >-
  If you use this software, please cite it using the
  metadata from this file.
type: software
authors:
  - given-names: Anne
    family-names: Researcher
Additional and optional metadata includes an abstract, repository URL and more.
Instead of typing out YAML manually we can also use the cffinit tool to make a CFF file
for us. CFF files can also be updated using the cffinit online tool by pasting the previous version of CFF file
and working through the form to update various fields.
Challenge: Creating CFF file and making your software citable
We can create (and later update) a CFF file for our software using an online application called
cffinitby following these steps:
- Head to
cffinitonline tool.- Then, work through the metadata input form to complete the minimum information needed to generate a CFF. We can use the following description as an “Abstract”: “A Python script to graph the locations of wave buoys around the UK”. Add the URL of the code repository as a “Related Resources”. Add at least one keyword under the “Keywords” section.
- At the end of the process, download the CFF file and inspect it. It should look like this:
# This CITATION.cff file was generated with cffinit.
# Visit https://bit.ly/cffinit to generate yours today!
cff-version: 1.2.0
title: Plot Buoys
message: >-
 If you use this software, please cite it using the
 metadata from this file.
type: software
authors:
 - given-names: Sauze
name-particle: Colin
 - given-names: Turner
family-names: Esther
 - given-names: Ferrira
family-names: Tobias
repository-code: >-
 https://github.com/YOUR-REPOSITORY-URL/intermediate-git-test-repo.git
abstract: >-
 A Python script to graph the locations of wave buoys around the UK.
keywords:
 - wave buoys
Citing
To cite our software (or dataset), once a CFF file has been pushed to our remote repository, GitHub’s “Cite this repository” button can be used to generate a citation in various formats (APA, BibTeX).
Further information is available from the Turing Way’s guide to software citation.
Archiving code to Zenodo and obtaining a DOI
Zenodo is a data archive run by CERN. Anybody can upload datasets up to 50GB to it and receive a Digital Object Identifier (DOI). Zenodo’s definition of a dataset is quite broad and can include code - which gives us a way to obtain a DOI for our software.
Let us now look into how we can archive a GitHub repository to Zenodo. Note that, instead of using the real Zenodo website, we will practice with Zenodo Sandbox.
Zenodo Sandbox
Zenodo Sandbox is a testing environment for Zenodo, a repository for research outputs, allowing users to safely experiment with its features without affecting the live system. It is a clone of Zenodo, created for testing purposes, that works exactly the same way as Zenodo you can use it for learning, training, experimenting, and preparing uploads without impacting the primary Zenodo repository until you are ready to publish and release your code (or other research outputs) officially. It will also not create real DOIs for a number of test repositories we use for this course and saturate the DOI space (remember that a DOI, once created, is meant to exist forever).
We can archive our GitHub repository to Zenodo (Sandbox) by doing the following:
- Go to the Zenodo Sandbox login page and choose to login with GitHub.
- Authorise Zenodo Sandbox to connect to GitHub.
- Go to the GitHub page in your Zenodo Sandbox account. This can be found in the pull down menu with your user name in the top right corner of the screen.
- You will now have a list of all of your GitHub repositories. Next to each will be an “On” button. If you have created a new repository you might need to press the “Sync” button to update the list of repositories Zenodo Sandbox knows about.
- Press the “On” button for the repository you want to archive. If this was successful you will be told to refresh the page.
- The repository should now appear in the list of “Enabled” repositories at the top of the screen, but it does not yet have a DOI. To get one we have to make a “release” on GitHub. Click on the repository and then press the green button to create a release. This will take you to GitHub’s release page where you will be asked to give a title and description of the release. You will also have to create a “tag” for your release - a way of having a friendly name for the version of some code in Git instead of using a long hash code. Often we will create a sequential version number for each release of the software and have the tag name match this, for example v1.0 or just 1.0.
- If we now refresh the Zenodo Sandbox page for this repository we will see that it has been assigned a DOI.
The DOI does not just link to GitHub, Zenodo will have taken a copy (a snapshot) of our repository at the point
where we tagged the release.
This means that even if we delete it from GitHub or even if GitHub were ever to go away or remove it,
there will still be a copy on Zenodo.
Zenodo will allow people to download the entire repository (more accurately, its state at the time it was tagged for release) as a single zip file.
Zenodo will have actually created two DOIs for you. One represents the latest version of the software and will always represent the latest if you make more releases. The other is specific to the release you made and will always point to that version. We can see both of these by clicking on the DOI link in the Zenodo page for the repository.
One of the things which is displayed on this page is a badge image that you can copy the link for and add to the README file in your GitHub repository so that people can find the Zenodo version of the repository. If you click on the DOI image in the Details section of the Zenodo page then you will be shown instructions for obtaining a link to the DOI badge in various formats including Markdown. Here is the badge for this repository and the corresponding Markdown:
![]()
[](https://doi.org/10.5281/zenodo.11869450)
Archive your repository to Zenodo (Sandbox)
Note: for this exercise, as demonstrated earlier, you should use the Sandbox Zenodo (a version of Zenodo for testing and playing with before minting a real DOI). For real software releases, you should use Zenodo.
- Create an account on Zenodo Sandbox that is linked to your GitHub account.
- Use Zenodo Sandbox to create a release for your repository and obtain a DOI for it.
- Get the link to the DOI badge for your repository and add a link to this image to your README file in Markdown format. Check that this is the DOI for the latest version and not the DOI for a specific version, if not you will be updating this every time you make a release.
Problems with GitHub and Zenodo integration
The integration between GitHub and Zenodo does not interact well with some browser privacy features and extensions. Firefox can be particularly problematic with this and might open new tabs to login to GitHub and then give an error saying:
Your browser did something unexpected.
Please try again. If the error continues, try disabling all browser extensions.
If this happens try disabling the extra privacy features/extensions or using another browser such as Chrome.
Adding a DOI to citation file
There are a few fields we can add now which are related to the DOI; one of these is the version file which covers
the version number of the software.
We can add a DOI to the file in the identifiers section with a type of doi and value of the Zenodo URL.
Optionally we can also add a date-released field indicating the date we released this software.
Here is an updated version of our CITATION.cff from the earlier with a version number, DOI and release date added.
# This CITATION.cff file was generated with cffinit.
# Visit https://bit.ly/cffinit to generate yours today!
cff-version: 1.2.0
title: Plot Buoys
message: >-
 If you use this software, please cite it using the
 metadata from this file.
type: software
authors:
  - given-names: Sauze
    name-particle: Colin
  - given-names: Turner
    family-names: Esther
  - given-names: Ferrira
    family-names: Tobias
repository-code: >-
  https://github.com/YOUR-REPOSITORY-URL/intermediate-git-test-repo.git
abstract: >-
  A Python script to graph the locations of wave buoys around the UK.
keywords:
 - wave buoys
version: 1.0.1
identifiers:
  - type: doi
    value: 10.5281/zenodo.1234
date-released: 2025-08-04
Add a DOI to your citation file
Add the DOI you were allocated in the previous exercise to your
CITATION.cfffile and then commit and push the updated version to your GitHub repository. If you used thecommitfield in yourCITATION.cfffile before to point to a given version of the code - you can now remove it as using the DOI field is better for this job.
Going further with publishing code
We now have our code published online, licensed as open source, archived with Zenodo, accessible via a DOI and with a citation file to encourage people to cite it. What else might we want to do in order to improve how findable, accessible or reusable it is? One further step we could take is to publish the code with a peer reviewed journal. Some traditional journals will accept software submissions, although these are usually as a supplementary material for a paper. There also journals which specialise in research software such as the Journal of Open Research Software, The Journal of Open Source Software or SoftwareX. With these venues, the submission will be the software itself and not a paper, although a short abstract or description of the software is often required.
Key Points