Remote Repositories
Overview
Teaching: 20 min
Exercises: 20 minQuestions
How can I work in remote teams and with remotely hosted code?
Objectives
Learn to work with multiple remotes
Git’s distributed collaboration model, which gives every developer their own copy of the repository, complete with its own local history and branch structure. Users typically need to share a series of commits rather than a single “changeset”. Instead of committing a “changeset” from a working copy to the central repository, Git lets you share entire branches between repositories (REFERENCE).
Git remote
The git remote command lets you create, view, and delete connections to other repositories. Remote connections are more like bookmarks rather than direct links into other repositories. Instead of providing real-time access to another repository, they serve as convenient names that can be used to reference a not-so-convenient URL.
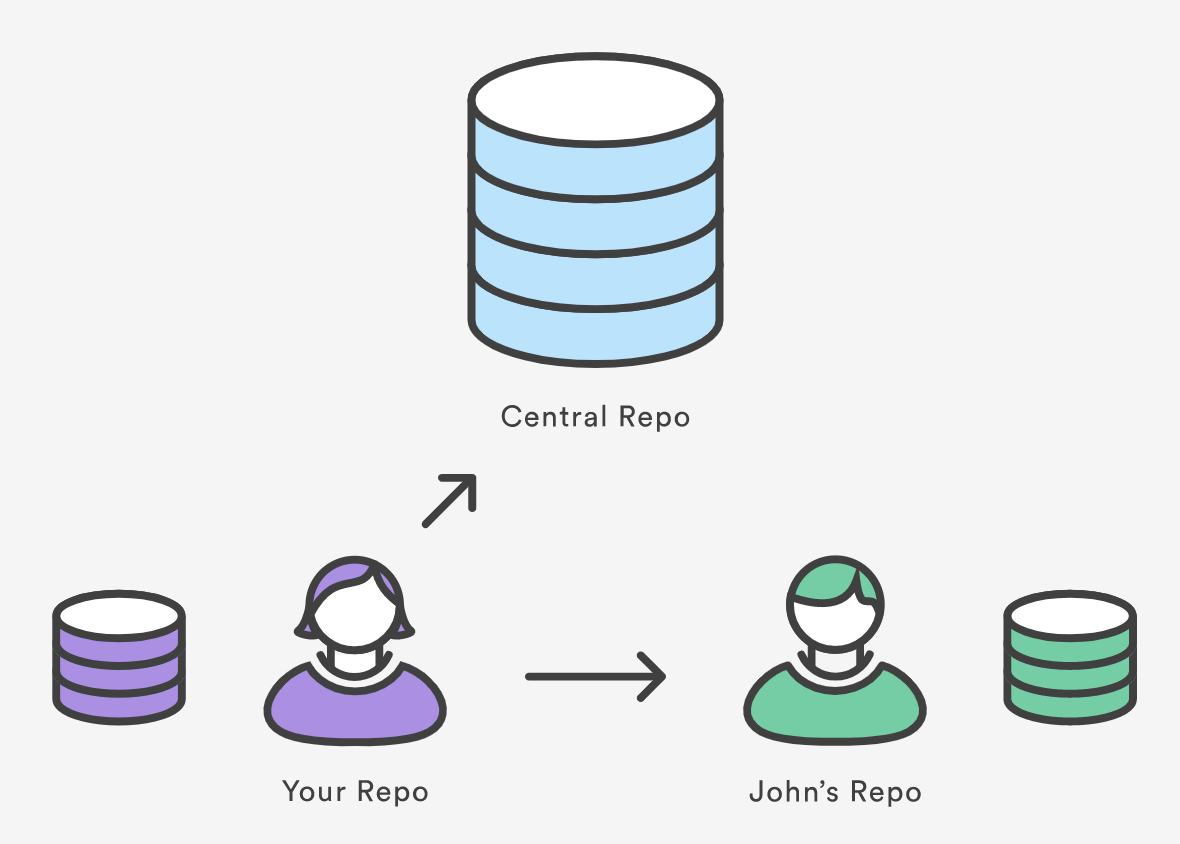
For example, the diagram above shows two remote connections from your repo into the central repo and another developer’s repo. Instead of referencing them by their full URLs, you can pass the origin and john shortcuts to other Git commands.
The git remote command is essentially an interface for managing a list of remote entries that are stored in the repository’s ./.git/config file. The following commands are used to view the current state of the remote list.
Git is designed to give each developer an entirely isolated development environment. This means that information is not automatically passed back and forth between repositories. Instead, developers need to manually pull upstream commits into their local repository or manually push their local commits back up to the central repository. The git remote command is really just an easier way to pass URLs to these “sharing” commands.
View Remote Configuration
To list the remote connections of your repository to other repositories you can use the git remote command:
git remote
If you test this in the local repo you’ve created, you should get only one connection, origin:
origin
When you clone a repository with git clone, git automatically creates a remote connection called origin pointing back to the cloned repository. This is useful for developers creating a local copy of a central repository, since it provides an easy way to pull upstream changes or publish local commits. This behaviour is also why most Git-based projects call their central repository origin.
We can ask git for a more verbose (-v) answer which gives us the URLs for the connections:
git remote -v
For our training repository this should return:
origin	git@github.com:<user-name>/intermediate-git-test-repo.git (fetch)
origin	git@github.com:<user-name>/intermediate-git-test-repo.git (push)
As expected these point to the repository you cloned.
Create and Modify Connections
The git remote command also lets you manage connections with other repositories. The following commands will modify the repo’s ./.git/config file. The result of the following commands can also be achieved by directly editing the ./.git/config file with a text editor.
Create a new connection to a remote repository. After adding a remote, you’ll be able to use <name> as a convenient shortcut for <url> in other Git commands.
git remote add <name> <url>
Remove the connection:
git remote rm <name>
Rename a connection:
git remote rename <old-name> <new-name>
To change the url for a remote:
git remote set-url <new-url>
To get high-level information about the remote <name>:
git show <name>
Exercise 1: Add and delete a connection to your neighbour’s repository.
Having this kind of access to individual developers’ repositories makes it possible to collaborate outside of the central repository. This can be very useful for small teams working on a large project.
Solution
git remote add john http://dev.example.com/john.git
git remote -v
git remote rm john
git remote -v
Multiple remotes
Remember that when you create a new branch without specifying a starting point, then the starting point will be the current state and branch. In order to avoid confusion, ALWAYS branch from the stable version. Here is how you would branch from your own origin/main branch:
git fetch origin main
git branch <branch> origin/main
git switch <branch>
You must fetch first so that you have the most recent state of the repository.
If there is another “true” version/state of the project, then this connection may be set as upstream (or something else). Upstream is a common name for the stable repository, then the sequence will be:
git fetch upstream main
git branch <branch> upstream/main
git switch <branch>
Now we can set the NOC-OI version of our repository as the upstream for our local copy.
Exercise 2: Setting upstream and checking out remote branches.
Set the https://github.com/NOC-OI/intermediate-git-test-repo repo as the upstream locally. Then check which branches exist upstream and create a local branch with the starting point of the upstream branch called
develop.Solution
git remote add upstream https://github.com/NOC-OI/intermediate-git-test-repo.git
git fetch upstream
git branch -vv -a
git branch develop upstream/develop
git switch develop
Now examine the state of your repository with
git branch,git remote -vandgit remote show upstream.
Tracking / Upstream Branches
We can see that we are now on a local branch develop, which is
configured to track the develop branch in upstream. Running git
push and git pull in this branch will automatically push to this remote branch. We can verify this with
$ git pull -v
Things get a little bit confusing here because one of our remotes, by convention, is called upstream. However, we will now start talking about upstream branches. What we mean by that is (typially) a remote branch which a local branch is tracking.
We can also examine our upstream branches some arguments to the git branch command. -a will show you local and remote branches and -vv will show the relationship to upstream branches.
Exercise 3: Upstream branches.
Try using the above arguments to
git branch.Solution
$ git branch -vva
If we wanted to switch the default remote for this branch, we could use git branch --set-upstream-to <remote/branch> (or --u).
The develop branch we checked out from the upstream remote branch a small commit which is not in your origin remote.
Exercise 4: Pushing to origin.
Push these changes we’ve pulled down to own remote repository (
origin).Solution
$ git push origin developRegardless of what is set as the upstream branch, you can always be explicit about the remote and branch name. There are many ways you could format this command, see the git push documentation for options.
Having Github and Gitlab Remotes
You might want to have remote copies of your repository on both Github and Gitlab. For example, you might have developed code on NOC’s Gitlab, in a private repository, but now you want a copy on Github, which will be open to the public.
We will actually demo this in reverse, seeing as our test repo is already set up on Github. Therefore, let’s create a blank project in Gitlab, add a new remote to our local repo and push the main branch to Gitlab.
Exercise 4: Set up a Gitlab remote.
Try to set up a remote in Gitlab, as discussed in the paragraph above.
We can configure as many remotes as we like. If you work closely with friends or colleagues, it could be common for you to want to pull interesting changes from their remotes, incorporate those into your current branches, and push those changes to your remote.
Key Points
The
git remotecommand allows us to create, view and delete connections to other repositories.Remote connections are like bookmarks to other repositories.
Other git commands (
git fetch,git push,git pull) use these bookmarks to carry out their syncing responsibilities.