
Versioning Data with Icechunk
Last updated on 2026-08-05 | Edit this page
Overview
Questions
- “What problems arise when we use plain Zarr for shared, evolving datasets?”
- “How does Icechunk add safety, consistency, and reproducibility on top of Zarr?”
- “How can we use transactions to update data atomically and avoid partial writes?”
- “How can we reference and replay specific versions of data for reproducible analysis?”
Objectives
- “Explain why versioning is important for Zarr-based scientific datasets.”
- “Describe Icechunk’s core concepts: repositories, transactions, snapshots, branches, and tags.”
- “Use Icechunk with Zarr to perform atomic updates and create reproducible versions.”
- “Recover from mistakes and open specific versions of a dataset.”
Why data versioning matters
Zarr is a strong format for cloud and parallel data access, but by itself it does not provide transactions, version history, or a built-in way to recover from mistakes. That can be a problem for shared scientific datasets. If several people are updating data, readers may see incomplete changes, accidental overwrites can be hard to recover from, and analyses can become difficult to reproduce later.
Icechunk adds version control on top of Zarr. It lets you manage data in a repository with transactions, snapshots, branches, and tags, so you can update data atomically, recover from mistakes, and refer to exact versions in future analysis.
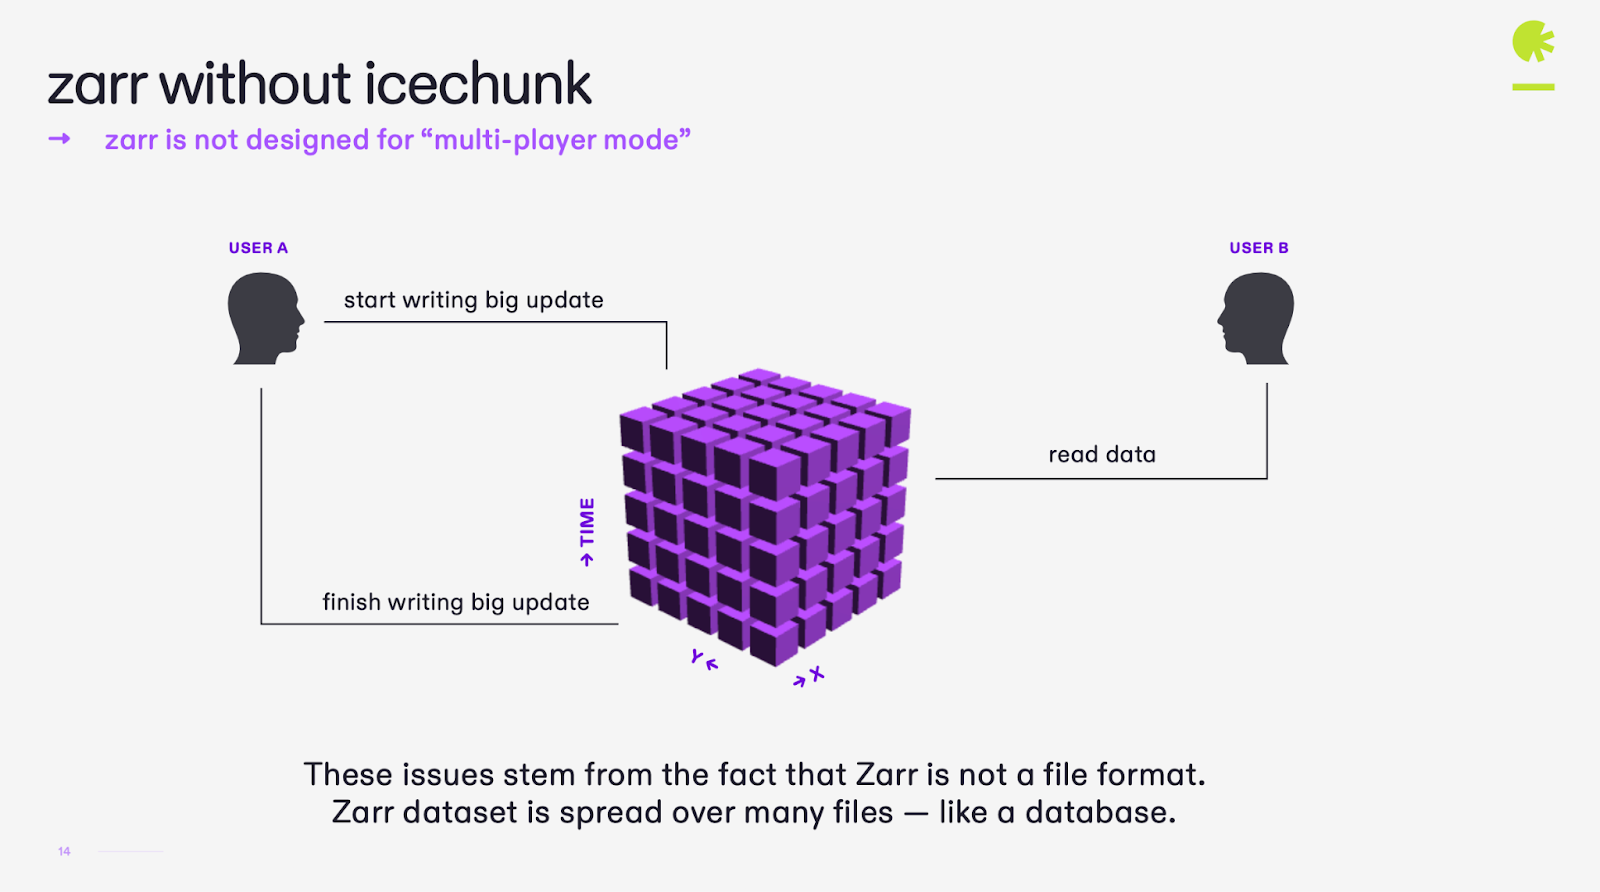
Icechunk concepts
Icechunk wraps Zarr stores inside repositories that track changes over time, in a similar way to how Git tracks changes to code. The main concepts are:
- Repository: the top-level object managing a Zarr hierarchy plus version history.
- Transaction: an atomic write session where multiple updates happen together; either all succeed or none do.
- Snapshot: an immutable version of the data after a transaction completes.
-
Branch: a named line of development, such as
mainordev. - Tag: a human-readable label pointing to a specific snapshot, useful for reproducible references.
The main idea is simple: writes happen in transactions, commits create snapshots, and readers open read-only sessions that always see a complete version of the dataset.
Comparison of plain Zarr vs Icechunk
This example was adapted from the Earth Mover Github repository and shows how Icechunk adds versioning and transactional semantics to Zarr.
In the backend, we have a Zarr and an Icechunk repository that are being updated in a loop, following the same pattern.
If you try to read the plain zarr store while it is being updated, you will see a mix of old and new data:
PYTHON
import matplotlib.pyplot as plt
import zarr

store = zarr.storage.FsspecStore.from_url("https://atlantis-vis-o.s3-ext.jc.rl.ac.uk/icechunk-demo/zarr")
root = zarr.open_group(store=store, mode='r', zarr_format=3)
arr = root['image']
img_data = arr[:]

# Plot the data
plt.imshow(img_data)
plt.axis('off')
plt.show()
If you try to read the Icechunk store while it is being updated, you will see either the old snapshot or the new snapshot, but never a mix.
PYTHON
import matplotlib.pyplot as plt
import zarr
import icechunk as ic

storage = ic.s3_storage(
	bucket="icechunk-demo",
	prefix="icechunk",
	endpoint_url="https://atlantis-vis-o.s3-ext.jc.rl.ac.uk",
	anonymous=True,
	force_path_style=True,
)

ic_repo = ic.Repository.open(storage)

# Start a read-only icechunk session
session = ic_repo.readonly_session("main")

# Get the zarr store
store = session.store

# Get all the zarr array values
root = zarr.open_group(store=store, mode='r')
arr = root['image']
img_data = arr[:]

# Plot the data
plt.imshow(img_data)
plt.axis('off')
plt.show()
This shows that Icechunk provides a safe, consistent, and reproducible way to manage evolving Zarr datasets, making it suitable for collaborative scientific workflows.

Exercise 1 - Map Git concepts to Icechunk
Before writing any code:
- Map familiar Git concepts to Icechunk:
- Git repository → Icechunk repository.
- Git commit → Icechunk snapshot.
- Git branch → Icechunk branch.
- Git tag → Icechunk tag.
- Discuss how these concepts help you reason about data changes over time.
- Discuss how “time travel” supports reproducibility.
Git concepts map naturally to Icechunk. An Icechunk repository stores the history of a dataset, similar to a Git repository for code. Snapshots are like Git commits, branches allow independent development, and tags mark important dataset versions.
These concepts make it easy to track changes, experiment safely, and understand how data evolves. Icechunk’s time travel feature allows you to access previous snapshots, making analyses reproducible by ensuring the exact dataset version can always be revisited.
Basic Icechunk workflow
A common workflow with Icechunk is:
- Configure access to your object store.
- Create or open an Icechunk repository in that object store.
- Start a writable session on a branch such as
main. - Add data to the repository, either by writing a dataset directly or by creating a virtual layer over an existing Zarr store.
- Commit the session to create a snapshot.
- Open the repository again in read-only mode for analysis.
In this lesson, we start with a Zarr dataset stored on your local machine and create an Icechunk repository in an object store. Once imported, the dataset can be versioned, allowing you to track changes over time while keeping the repository in object storage.
Step 1 - Connecting to the object store
PYTHON
import os
import xarray as xr
import icechunk as ic

os.environ["AWS_ACCESS_KEY_ID"] = "your-access-key"
os.environ["AWS_SECRET_ACCESS_KEY"] = "your-secret-key"

storage_options = {
    "key": os.environ["AWS_ACCESS_KEY_ID"],
    "secret": os.environ["AWS_SECRET_ACCESS_KEY"],
    "client_kwargs": {
        "endpoint_url": "https://atlantis-vis-o.s3-ext.jc.rl.ac.uk"
    },
    "config_kwargs": {
        "request_checksum_calculation": "when_required",
        "response_checksum_validation": "when_required",
    },
}
Step 2 - Opening the local Zarr store
Open the local Zarr dataset with xarray. We are going to use the
data/era5_sst/ocean_temperature.zarr (ERA5 Reanalysis)
dataset as an example.
Step 3 - Creating the Icechunk repository
Create (or open) an Icechunk repository in the object store and write the dataset into it.
First, configure the Icechunk storage to point to the object store:
PYTHON
storage = ic.s3_storage(
    bucket="cloud-native-geoscience-course", # the name of the bucket where the Icechunk repository will be stored
    prefix="icechunk-repo", # the prefix in the bucket where the Icechunk repository will be stored
    endpoint_url=storage_options["client_kwargs"]["endpoint_url"],
    access_key_id=storage_options["key"],
    secret_access_key=storage_options["secret"],
    region="us-east-1", # the region of the bucket
    force_path_style=True, # the endpoint uses path-style access
    checksum_algorithm=None, # the endpoint does not support checksums
)
Because we are using an object store that does not support
conditional updates (JASMIN), we need to disable Icechunk’s safety
checks for conditional updates and creates. This is done by setting
unsafe_use_conditional_update and
unsafe_use_conditional_create to False. This
step is optional if you are using an object store that supports
conditional updates, such as AWS S3.
PYTHON
storage_settings = ic.StorageSettings(
    unsafe_use_conditional_update=False,
    unsafe_use_conditional_create=False,
)
Now we can create the Icechunk repository in the object store. If the repository already exists, it will be opened instead.
PYTHON
repo_config = ic.RepositoryConfig(storage=storage_settings)
repo = ic.Repository.open_or_create(storage, config=repo_config)
When I do the above, I can see that the repository is created in the
object store. Now I can start a writable session on the
main branch and add the dataset to it.
PYTHON
# Import the `to_icechunk` function from the `icechunk.xarray` module
from icechunk.xarray import to_icechunk

# Create a writable session on the main branch
session = repo.writable_session("main")

# Save the dataset to the Icechunk repository
to_icechunk(
    ds,
    session,
)
Now that the dataset is added to the Icechunk repository, I can commit the session to create a snapshot.
After committing the session, the dataset is stored as an Icechunk repository in the object store. Future changes can be committed as new snapshots without modifying previous versions.
Step 4 - Reading from the main branch
To read the dataset from the Icechunk repository, I can open a
read-only session on the main branch:
And them use xarray to open the dataset from the Icechunk repository:
You can also use
This is the standard way to read data from an Icechunk repository.
Opening a read-only session on the main branch gives you a
consistent snapshot of the dataset, ensuring that analyses always use a
well-defined version of the data.
Exercise 2 - Your turn: open the ocean_temperature zarr dataset and and add Icechunk
Using the data/era5_sst/ocean_temperature.zarr
dataset:
- Open the store with xarray.
- Create an Icechunk repository in the object store.
- Add the Zarr store to Icechunk.
- Reopen the dataset from
main. - Compare the result with the local Zarr store.
Questions:
- What changes when the store is managed by Icechunk?
- What do you gain by reading from a branch instead of a raw Zarr path?
Set the object store credentials:
PYTHON
import os
import xarray as xr
import icechunk as ic

storage_options = {
    "key": os.environ["AWS_ACCESS_KEY_ID"],
    "secret": os.environ["AWS_SECRET_ACCESS_KEY"],
    "client_kwargs": {
        "endpoint_url": "https://atlantis-vis-o.s3-ext.jc.rl.ac.uk"
    },
    "config_kwargs": {
        "request_checksum_calculation": "when_required",
        "response_checksum_validation": "when_required",
    },
}
Open the local zarr store:
PYTHON
# Open the local Zarr store
base_path = "/gws/ssde/j25b/atlantis_vis/cloud-native-geoscience-course/"  # or "" if you have the data in your current working directory

ds = xr.open_zarr(f"{base_path}data/era5_sst/ocean_temperature.zarr")
Create an Icechunk repository in the object store:
PYTHON
storage = ic.s3_storage(
    bucket="my-bucket",
    prefix="icechunk-repo",
    endpoint_url=storage_options["client_kwargs"]["endpoint_url"],
    access_key_id=storage_options["key"],
    secret_access_key=storage_options["secret"],
    region="us-east-1",
    force_path_style=True,
    checksum_algorithm=None,
)

storage_settings = ic.StorageSettings(
    unsafe_use_conditional_update=False,
    unsafe_use_conditional_create=False,
)
repo_config = ic.RepositoryConfig(storage=storage_settings)
repo = ic.Repository.open_or_create(storage, config=repo_config)
Import the dataset into Icechunk and commit it:
PYTHON
from icechunk.xarray import to_icechunk

session = repo.writable_session("main")

to_icechunk(
    ds,
    session,
)

snapshot = session.commit("Initial import of ocean_temperature.zarr")
print(f"Snapshot: {snapshot}")
Reopen the dataset from the main branch and compare it with the local Zarr store:
PYTHON
ro_session = repo.readonly_session("main")

ds_icechunk = xr.open_zarr(
    ro_session.store,
    consolidated=False,
)

print("Icechunk dataset:")
print(ds_icechunk)
print("Local Zarr dataset:")
print(ds)
The dataset contents are the same before and after importing into Icechunk. The main difference is that the Icechunk version is now version-controlled, allowing changes to be committed as new snapshots without overwriting previous versions.
Making an atomic update
Icechunk transactions let you make multiple updates to a dataset atomically. This means that either all changes are applied together, or none are applied at all. This is important for maintaining consistency in the dataset, especially when multiple variables/time steps are being updated simultaneously or when multiple users are accessing the data.
PYTHON
import zarr
import numpy as np

with repo.transaction("main", message="Update temperature values") as store:
    root = zarr.open_group(store)
    ny, nx = root["sst"].shape[1:]

    root["sst"][0, :, :] = np.random.rand(ny, nx).astype(np.float32)
    root["sst"][1, :, :] = np.random.rand(ny, nx).astype(np.float32)
In the code above, we start a transaction on the main
branch and update two time steps of the sst variable with
random values. The transaction ensures that both updates are applied
together. If any part of the transaction fails, none of the changes will
be applied, preserving the integrity of the dataset.
With plain Zarr, a reader might see a mix of old and new values if they access the dataset while the update is in progress. With Icechunk, readers will see either the old snapshot or the new snapshot, but never a mix.
If you try to plot the data after the update, you will see either the old or new values, but not a mix (like the example with the shark image above). This ensures that analyses are based on consistent data.
Recovering from mistakes
A major advantage of Icechunk is that mistakes are reversible. If a bad update is committed, you can go back to a previous snapshot and restore the branch.
For example, you can list the history of snapshots on a branch:
PYTHON
history = list(repo.ancestry(branch="main"))

for i, snap in enumerate(history):
    print(i, snap.id, snap.message)
In the last commit, you can see the message related to the bad update (adding random values). You can then reset the branch to the previous snapshot, effectively undoing the bad update.
PYTHON
history = list(repo.ancestry(branch="main"))
prev_snapshot = history[-2].id # get the previous snapshot id
repo.reset_branch("main", prev_snapshot) # reset the branch to the previous snapshot
Then reopen the dataset and confirm that the original data have returned:
PYTHON
session = repo.readonly_session("main")
ds_main = xr.open_zarr(session.store)
ds_main.sst.isel(valid_time=0).plot() # now you should see the original data again
This is much safer than overwriting a plain Zarr store, where recovery usually depends on external backups or manual copies.
Exercise 3 - Atomic update of a variable in two different time steps
Using the ocean_temperature dataset in Icechunk:
- Open the dataset from the
mainbranch. - Start a transaction and update at least two time steps together. Try to make the update clearly visible, such as adding a constant value or multiplying by a factor.
- Open the dataset again in a read-only session.
- Confirm that you see either the old version or the new version, but not a mix.
Questions:
- Why is atomicity important for downstream analysis?
- How does this differ from writing directly to Zarr without Icechunk?
Update the dataset:
PYTHON
import zarr
import numpy as np

with repo.transaction("main", message="Update temperature values") as store:
    root = zarr.open_group(store)
    ny, nx = root["sst"].shape[1:]

    root["sst"][0, :, :] = root["sst"][0, :, :] * 10.0
    root["sst"][1, :, :] = root["sst"][1, :, :] * 10.0
Open the dataset again in a read-only session:
Exercise 4 - Recover from a bad update
Using the example dataset:
- Make a good update and commit it to
main. It can be a simple update, such as adding a constant value to one time step. - Make a bad update that clearly corrupts one time step and commit it
to
main. You can use random values or a constant that is clearly wrong. - Inspect the dataset and confirm the bad values are present.
- Find the previous snapshot and reset the branch.
- Reopen the dataset and confirm recovery.
Questions:
- What would you need to do to recover the same mistake in plain Zarr?
Make a good update:
PYTHON
with repo.transaction("main", message="Good update") as store:
    root = zarr.open_group(store)
    root["sst"][0, :, :] = root["sst"][0, :, :] + 1.0
Make a bad update:
PYTHON
with repo.transaction("main", message="Bad update") as store:
    root = zarr.open_group(store)
    root["sst"][10, :, :] = np.random.rand(*root["sst"][1, :, :].shape).astype(np.float32)
Inspect the dataset and confirm the bad values are present:
PYTHON
ro_session = repo.readonly_session("main")
ds_main = xr.open_zarr(
    ro_session.store,
    consolidated=False,
)
ds_main.sst.isel(valid_time=10).plot()
Find the previous snapshot and reset the branch:
PYTHON
history = list(repo.ancestry(branch="main"))
prev_snapshot = history[-2].id
repo.reset_branch("main", prev_snapshot)
Reopen the dataset and confirm recovery:
PYTHON
ro_session = repo.readonly_session("main")
ds_main = xr.open_zarr(
    ro_session.store,
    consolidated=False,
)
ds_main.sst.isel(valid_time=10).plot()
With a plain Zarr store, you would need to rely on external backups or manual copies to recover from a bad update, which is less convenient and more error-prone.
Branches and reproducibility
Branches and tags are useful when a dataset evolves but you need to
preserve a stable version for analysis or reproduction. A branch such as
main can continue changing, while a tag gives you a fixed
reference point for a publication, report, or operational run.
PYTHON
# Get the current snapshot of the main branch
snapshot = repo.lookup_branch("main")

# Create a tag pointing to this snapshot
repo.create_tag("v1.0.0", snapshot)

# Open the dataset using the tag
session = repo.readonly_session(tag="v1.0.0")
ds = xr.open_zarr(
    session.store,
    consolidated=False,
)

# Example analysis
mean_sst = ds.sst.mean(dim=("latitude", "longitude")).compute()
print(mean_sst)
This makes it easy to say exactly which version of the data was used, and to reopen that same version later for verification or reruns.
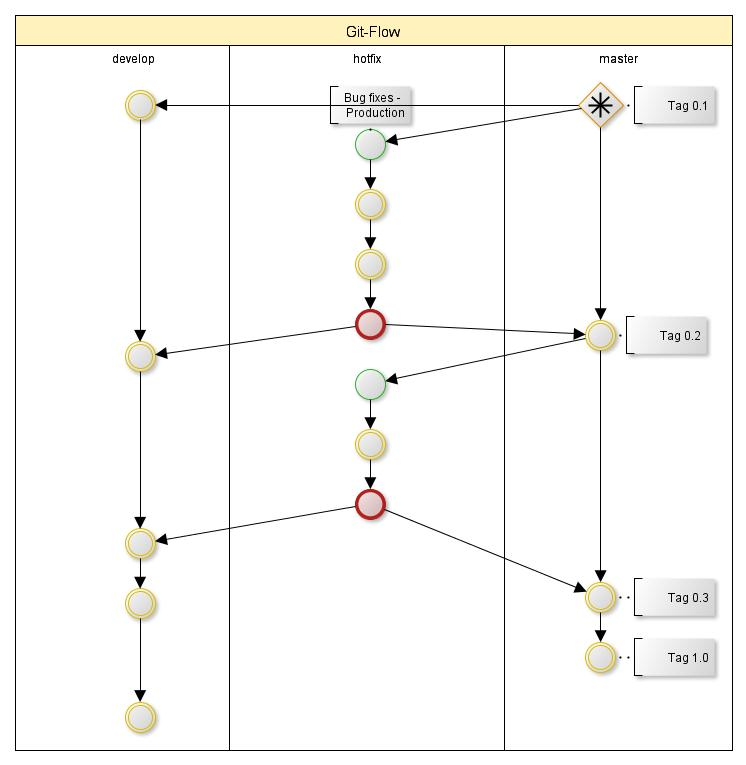
The diagram below shows the Git workflow, which is similar to Icechunk’s workflow. You can create branches for development, commit changes to snapshots, and tag important versions for reproducibility.
Exercise 5 - Tag a reproducible version
- Create a tag for the last version of main branch that you want to treat as a release.
- Open the dataset using that tag.
- Run a small analysis, such as a mean over space.
- Update the main branch with a new commit.
- Repeat the same analysis later using the main branch and the tag, and compare the results.
Questions:
- Did the results stay the same?
- Why is a tag better than saying “we used the latest version”?
Create a tag for the last version of the main branch:
PYTHON
# Get the current snapshot of the main branch
snapshot = repo.lookup_branch("main")

# Create a tag pointing to this snapshot
repo.create_tag("v1.0.0", snapshot)
Open the dataset using that tag and run a small analysis:
PYTHON
session_tag = repo.readonly_session(tag="v1.0.0")
ds_tag = xr.open_zarr(
    session_tag.store,
    consolidated=False,
)
mean_sst_tag = ds_tag.sst.mean(dim=("latitude", "longitude")).compute()
print(mean_sst_tag)
Update the main branch with a new commit:
PYTHON
with repo.transaction("main", message="New update") as store:
    root = zarr.open_group(store)
    root["sst"][0, :, :] = root["sst"][0, :, :] + 2.0
Open the dataset again using the main branch and run the same analysis:
PYTHON
session_main = repo.readonly_session("main")
ds_main = xr.open_zarr(
    session_main.store,
    consolidated=False,
)
mean_sst_main = ds_main.sst.mean(dim=("latitude", "longitude")).compute()
print(mean_sst_main)
You can compare the results from the tag and the main branch. The results should differ, as the main branch has been updated while the tag points to a specific snapshot. This demonstrates that using a tag provides a stable reference for reproducible analysis, while relying on the latest version can lead to inconsistencies.
- “Plain Zarr lacks built-in transactions, history, and recovery.”
- “Icechunk adds repositories, transactions, snapshots, branches, and tags.”
- “Transactions make multi-variable updates atomic.”
- “Branches and tags make reproducible analysis possible.”
- “Version history makes it much easier to recover from mistakes.”